Develop and Test Local Changes
Overview
In this quickstart, you'll learn how to use Signadot Sandboxes for local development workflows that connect with your Kubernetes environment. The setup involves configuring a local mapping between the cluster and your workstation or development container.
A key advantage of this approach is that your remote cluster can be safely shared across your team. When you create a sandbox with a local mapping, only requests with your specific routing key are directed to your local workstation. Other developers' traffic remains unaffected. This selective routing allows multiple developers to work on the same cluster simultaneously without interfering with each other's work or impacting the baseline environment.
Using the HotROD sample application, you'll learn how to:
- Connect your local workstation or development container to a Kubernetes cluster
- Run a service locally while connecting to cluster dependencies
- Extract configuration from the cluster for your local service
- Test your local changes with live cluster traffic
This hands-on guide will show you how to develop locally without needing to recreate your entire stack.
Setup
Before you begin, you'll need:
- Signadot account (sign up here)
- Signadot CLI (installation instructions)
- A Kubernetes cluster
Option 1: Set up on your own Kubernetes cluster
Using minikube, k3s, or any other Kubernetes cluster:
- Install the Signadot Operator: Install the operator into your cluster.
- Install the HotROD Application: Install the demo app using the appropriate overlay:
- Istio
- Linkerd / No Mesh
kubectl create ns hotrod --dry-run=client -o yaml | kubectl apply -f -
kubectl -n hotrod apply -k 'https://github.com/signadot/hotrod/k8s/overlays/prod/istio'
kubectl create ns hotrod --dry-run=client -o yaml | kubectl apply -f -
kubectl -n hotrod apply -k 'https://github.com/signadot/hotrod/k8s/overlays/prod/devmesh'
Option 2: Use a Playground Cluster
Alternatively, provision a Playground Cluster that comes with everything pre-installed.
Demo App: HotROD
HotROD is a ride-sharing application with four microservices:
frontend: Web UI for requesting ridesdriver: Manages drivers in the systemroute: Calculates ETAslocation: Provides available pickup and dropoff locations for riders
The services use Kafka as a message queue, and Redis and MySQL for data storage.

Step 1: Configure Cluster Connectivity
Set up the infrastructure for local-to-cluster communication using the Signadot CLI. First, authenticate with your Signadot account:
signadot auth login
For more authentication options, see the CLI authentication guide. Then configure your local connection:
-
Create
$HOME/.signadot/config.yaml:local:
connections:
- cluster: <cluster> # From https://app.signadot.com/settings/clusters
type: ControlPlaneProxynoteControlPlaneProxyestablishes the connection from your machine via the Signadot control plane, making it ideal for getting started quickly. However, it is intentionally rate-limited and not recommended for production use. Large assets (e.g. JavaScript bundles over 1 MB) may load slowly, and high-throughput workloads may experience timeouts. For day-to-day development and production use, switch toPortForwardorProxyAddressconnection types instead. These options routesignadot localtraffic directly from your workstation or development container to/from the cluster, bypassing the control plane for significantly better throughput and latency. -
Connect to the cluster:
You'll be prompted for your password as
signadot local connectneeds root privileges for updating/etc/hostswith cluster service names and configuring networking to direct local traffic to the cluster.Connect to Cluster$signadot local connectsignadot local connect has been started ✓* runtime config: cluster demo, running with root-daemon✓ Local connection healthy!* operator version x.y.z* port-forward listening at ":59933"* localnet has been configured* 45 hosts accessible via /etc/hosts* sandboxes watcher is running* Connected Sandboxes:- No active sandbox -
Verify connectivity:
curl http://frontend.hotrod.svc:8080
Cluster services are now accessible from your local machine using their Kubernetes DNS names!
Step 2: Set up a Sandbox with a Local Mapping
Now let's create a sandbox that routes traffic from the cluster to a service running locally on your workstation or development container. We'll work with the route service which calculates ETAs for the HotROD application.
First, clone the HotROD repository:
git clone https://github.com/signadot/hotrod.git
cd hotrod
Create a sandbox specification with a local mapping. Save this as local-route.yaml:
name: local-route-dev
spec:
  description: Local development for route service
  cluster: "@{cluster}"
  ttl:
    duration: 1d
  local:
  - name: "local-route"
    from:
      kind: Deployment
      namespace: hotrod
      name: route
    mappings:
    - port: 8083
      toLocal: "localhost:8083"
The local section defines a local mapping that tells Signadot to:
- Route traffic destined for the
routedeployment in thehotrodnamespace - Send it instead to
localhost:8083on your workstation or development container - Do this for requests that include the sandbox routing key
Apply the sandbox using the CLI:
signadot sandbox apply -f ./local-route.yaml --set cluster=<cluster>
Replace <cluster> with the name of your linked cluster from https://app.signadot.com/settings/clusters.
Sandboxes with local mappings must be created using the CLI from the machine where you'll run the local service. This associates the sandbox with your workstation or development container and establishes the secure tunnel from the cluster to your local machine.
Step 3: Run the Service Locally
The route service needs environment variables from the cluster to run properly. Extract them using:
eval $(signadot sandbox get-env local-route-dev)
This exports all the environment variables that the route service uses in the cluster (database credentials, service URLs, etc.) to your local shell.
signadot sandbox get-env and signadot sandbox get-files require kubectl read access to workloads, ConfigMaps, and Secrets for the kubectx associated with your local connection. For more details on extracting and overriding configuration, see the sandbox specification reference.
Now start the route service locally:
go run ./cmd/hotrod/main.go route
The service is now running on your workstation or development container and ready to receive traffic from the cluster!
Step 4: Test Your Local Changes
With your local service running, you can test it by routing traffic through your sandbox.
Routing Traffic to Your Local Service
You can route traffic to your local service using either the Signadot Chrome Extension or any header-setting extension:
- Signadot Chrome Extension (Recommended)
- Third-party Header-Setting Extension
- Install the Signadot Chrome Extension
- Open the extension and search for your sandbox name "local-route-dev"
- The extension will automatically set the correct routing key header
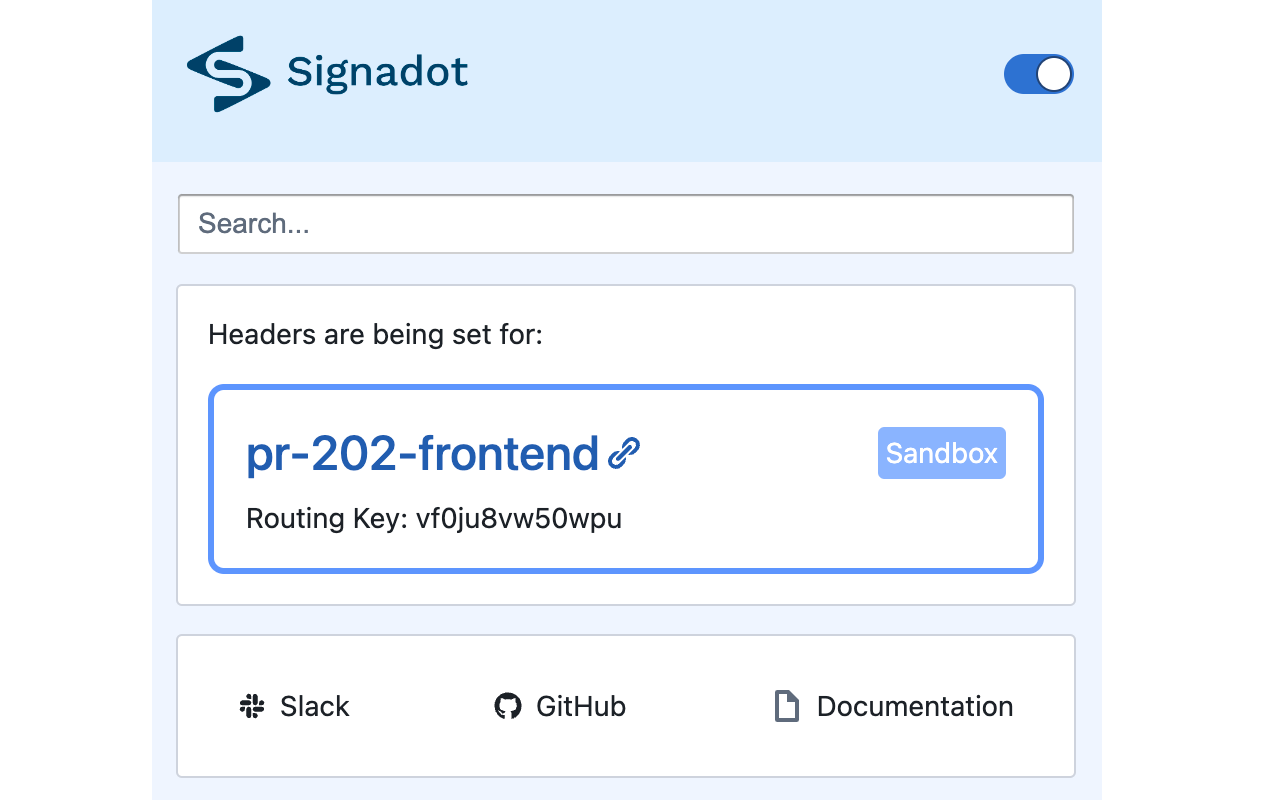
- Install any header-setting extension like Requestly
- Configure it to set the
baggageheader with your sandbox's routing key:Wherebaggage: sd-routing-key=<routing-key><routing-key>is the value from your sandbox's CLI output or dashboard
Visit http://frontend.hotrod.svc:8080 and request a ride. The frontend will make requests to the route service, and those requests will be routed to your local workstation or development container! You can now:
- Set breakpoints in your IDE
- Make changes to the code
- See the results immediately in the application
- Test against live cluster dependencies
Iterating on Your Code
Try modifying the route service behavior:
- Edit the route calculation logic in your local code (for example, see this change that makes drivers arrive in seconds instead of minutes)
- Restart the service with
go run ./cmd/hotrod/main.go route - Refresh the HotROD UI with your routing key active
- See your changes immediately reflected
Developers can run their services either directly on their machine (as shown above) or via containers, binding to the specified ports to integrate with the sandbox environment.
How Sandboxes with Local Mappings Work
Sandboxes with local mappings work by:
- Establishing a secure bidirectional tunnel between the cluster and your workstation or development container
- Creating a routing rule in your cluster:
- Checks if the routing key for the sandbox is present in the request context
- If so, the request intended for the specified service is sent over the local mapping to
localhoston the specified port
This means:
- You only run the service you're developing locally
- All dependencies remain in the cluster
- Your local service gets real traffic with proper context
- Multiple developers can have their own sandboxes with local mappings simultaneously
Cleanup
When you're done with your local development session:
- Stop your local service (Ctrl+C)
- Delete the sandbox:
signadot sandbox delete local-route-dev - Disconnect from the cluster (optional):
signadot local disconnect
Conclusion
You've successfully set up a local development workflow with Signadot Sandboxes! This approach lets you develop locally while testing against real cluster dependencies, without managing complex infrastructure.
To learn more:
- Sandboxes with Local Mappings Guide for advanced patterns
- API Override Guide for testing with mocked dependencies
- Local CLI Reference for detailed command options