Discover how Signadot Sandboxes can revolutionize your feature testing process. This tutorial walks you through adding a new feature to a microservice, testing it in isolation, and integrating it with other services. Experience a seamless, efficient workflow that leaves your baseline staging environment untouched.
In this guide you’ll learn how to test a new feature that impacts multiple microservices using Signadot Sandboxes. We’ll use this fork of the Online Boutique microservices demo app to demonstrate the workflow, which can be automated using Signadot’s GitHub integration.
We’ll add a new feature to the checkout service: new orders will contain a shipping tracking number. We’ll also add a field in the frontend service to display this tracking information to the user. Using Sandboxes, you’ll be able to test these features independently using your existing baseline staging environment and running staging services. Using a RouteGroup, you’ll be able to test the feature end-to-end, while still using your baseline staging environment.
By the end of this guide, you’ll have done the following:
Before you begin, you should have the following available to you:
* You can also use a local cluster like kind or minikube * Your cluster should have at least the following
* 4 CPUs * 4.0 GiB memory * 32 GB disk space
* kubectl, configured to access your K8s cluster * Docker Desktop, logged in and configured to access a Docker repository * Helm * A Signadot account
To begin, we’ll install the Signadot Operator into our cluster and install the Signadot CLI on our local machine.
The Signadot Operator maintains a connection with the Signadot control plane / backend and manages workloads in your K8s cluster, like Sandboxes and their associated resources. It also manages routing for requests between services. To learn more about the Operator and its functions, please see Signadot Operator.
From the Signadot Dashboard navigate to Clusters and then Connect Cluster. Supply a cluster name that identifies the cluster you are using. The onboarding UI will present you with the following installation instructions that you can copy and paste (be sure to replace cluster-token with the provided cluster token):
To learn more about this step, please see Install the Signadot Operator. With the Operator up and running in our cluster, we’ll now install the Signadot CLI on our local machine.
Download and extract the latest release. You can also use the Homebrew package manager:
To learn more about installing the Signadot CLI, please see the CLI docs.
Configure the CLI by creating a file at $HOME/.signadot/config.yaml.
The file should contain the following:
You can create an API key by navigating to the Signadot dashboard.
Test that everything is working:
With the Operator and CLI ready to go, we’ll deploy the microservices demo app as our baseline environment.
In this step you’ll deploy a forked version of Google’s Online Boutique microservices demo app. Online Boutique is an 11-tier e-commerce app that consists of various microservices, like a frontend service, a checkout service, a recommendation service, and more. In this guide we’ll modify checkoutservice and frontend to display a shipping tracking number to the user (note the original app has this feature, but we’ve removed it in this fork to demonstrate the workflow in this guide):
Begin by cloning the demo app (ensure you clone the fork, and not the app in the Google repo):
The manifests in kubernetes-manifests are ready to deploy. These contain the “baseline” version of our app which will simulate a running staging environment. Usually this will be the version corresponding to the main or master branch (or staging, depending on your org’s workflow).
Deploy the app to your cluster:
Wait approximately 2-3 minutes for the app to stabilize. You should see the following running Pods:
Note that each Pod contains two running containers: the Signadot Operator automatically creates sidecar containers to proxy requests to the appropriate sandboxes. Annotations on workloads instruct Signadot on which workloads to proxy and how to proxy requests. To learn more, please see Request Routing and an example in this Github repo.
You can then navigate to the app’s frontend using kubectl port-forward:
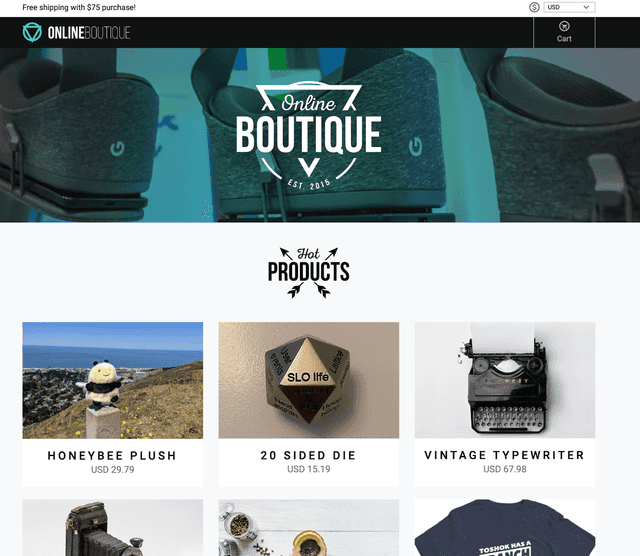
Visit http://localhost:8080 and you should see the app’s landing page:
With our e-commerce app up and running, we’re ready to PR our first change to the checkout backend service.
In this step we’ll add the new feature to the checkout service, and test it in a Sandbox. The Sandbox will contain the modified version of the checkout service, and requests will be routed through existing “baseline” versions of other services. A request to the Sandbox will flow through the already running frontend service, onto the modified checkout service, and to any other running baseline microservices. To learn more about how this works, please see request routing.
To begin, let’s create a new git branch and make the the change in the branch:
Next, we’ll make the code change. Using your favorite editor, open the file src/checkoutservice/main.go . Make the following changes:
Instead of discarding the return value using _ , we save it. Be sure to use the short variable declaration operator :=.
Next, add the ShippingTrackingId field to OrderResult:
We set the returned value in an OrderResult which will get sent back to the frontend.
That’s it for our changes, so we’ll build an image containing the modified code, and push it up to our Docker repo so it can get pulled into the cluster. Normally, you’d probably commit your changes, open a PR, and your CI tooling take care of the rest — for demonstration purposes we’ll perform these steps manually.
Note: if you’re working with a local K8s cluster, you can build the image and load it manually onto the cluster “node” instead of pushing it to a repo, for example with kind load docker-image.
Build and tag the image:
Once it’s been built, push it to your repo:
Note: Be sure to build the appropriate image for the Nodes your K8s cluster runs on. You can use Docker’s buildx to build multi-platform images. To learn more, please see Multi-platform images.
At this point, the modified image is available for use in the cluster. We’ll now use a Sandbox to test the feature with our existing baseline environment.
In this step you’ll create a Sandbox to test the new checkout service feature.
Begin by creating a Sandbox spec:
Here we use variables in the name and image fields, which we’ll pass in using the CLI. We perform this step manually here, but in a production setting you can automate this using your CI tooling.
We “fork” the checkoutservice workload, and specify that the field we’re modifying is the container image. We also add optional endpoints that will leverage the Signadot backend to return easy-to-use URLs that will handle proper request routing to the Sandbox.
Create the Sandbox using the Signadot CLI:
Note that feat-x-add-tracking-id-latest is the tag we used when we pushed our Docker image.
You should see output like the following:
At this point, the Sandbox has been created and you can use the URLs to perform requests against the demo app. The checkout-endpoint URL will route requests to a Pod running the modified checkout service (and handle routing subsequent requests to other running baseline microservices). The frontend-endpoint URL will route requests to a Pod running the baseline frontend service, routing the request through the modified checkout service.
You can use a tool like Postman or grpcurl to test your Service. Requests against the checkout service sandbox endpoint should now contain the added tracking ID:
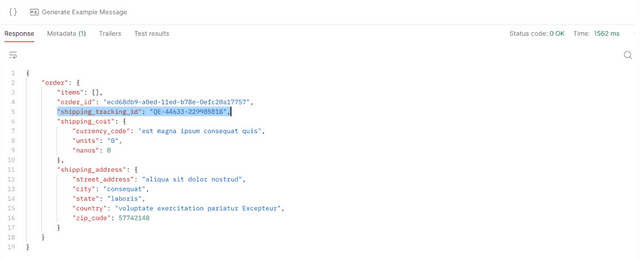
To use Postman to test the sandboxed service, create a new gRPC request against `grpc://checkout-endpoint—feat-x-checkoutsvc.preview.signadot.com` (the URL returned by the Signadot CLI). Be sure to upload the Proto to Postman and select the `CheckoutService/PlaceOrder` method. You can click on Generate Example Message to generate a sample payload. Be sure to set the Signadot API key in the Authorization tab of the request UI, and click on the lock in the URL bar to enable auth.
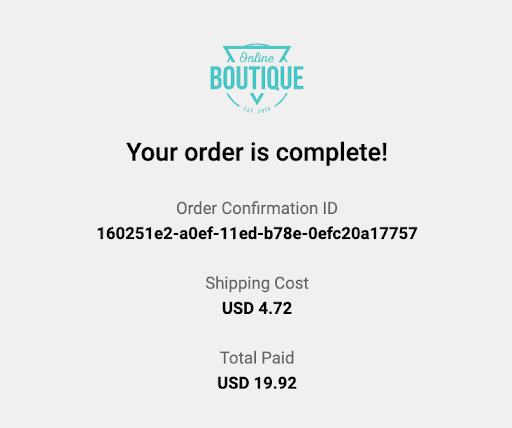
If we navigate to the frontend endpoint, we notice we are still using the baseline version of the service, which does not not know how to display this new field to the user:
We can also confirm that a new Pod has been created, and that the only new Pod is the service we’ve modified in this step:
At this point, you can QA your new feature with your existing baseline staging environment and running microservices. The frontend team can also develop their changes against the checkout service sandbox. In the next step, we’ll simulate adding the corresponding frontend change to the frontend service.
In this step, we’ll make the corresponding change to the frontend service. Since the process closely mirrors what we did in previous steps, we’ll skim over the details here.
For the purposes of this guide, we’ll assume a single monorepo containing all the app’s microservices: the checkout service team works in one branch, and the frontend team works in a separate branch. This can be easily extended to environments where each microservice has its own dedicated team and repo.
Return to main and create a new branch for the frontend feature work. Be sure to commit or stash your checkout service changes before switching branches.
We can now make our change. Open src/frontend/templates/order.html and add a
section displaying the tracking info:
Here we extract the new ShippingTrackingId field added by the checkout service, and display it to the user.
Build and push the image (be sure to use a different DOCKER_REPO here):
Next, create the Sandbox:
We can then create the Sandbox using the CLI:
Once the Sandbox is up and running, we can visit the returned URL to test our change:

The Sandbox “forked” the frontend service and routes requests through baseline versions of all the other services. This means that requests returned from the checkout service will not contain the new field. To test the service end-to-end, across both sandboxes, we can use a RouteGroup.
In this step we’ll create a RouteGroup to test the changes across both Sandboxes. This will route the request from the frontend Sandbox to the checkout service Sandbox, while using existing baseline versions of other services.
Create the RouteGroup:
We match on the branch label set in the Sandbox templates and return endpoints to the frontend and checkout services.
Apply the RouteGroup using the Signadot CLI:
Navigate to the frontend endpoint to test both modified services together:
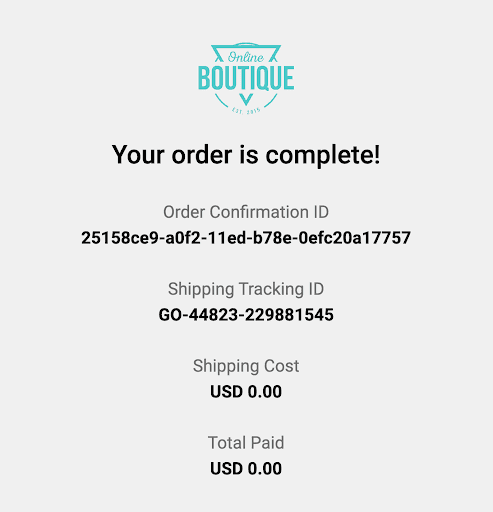
We see that the request has been routed through the frontend and checkoutservice sandboxes, and can test the feature end to end. Inspecting running Pods, we observe that the only new workloads are Deployments for the sandboxed microservices:
Once both teams are ready to merge their changes, the sandboxes and RouteGroup can be deleted:
In this guide you learned how to test features that span multiple microservices using Signadot Sandboxes. Concepts from this guide can be automated using your preferred CI tooling: Signadot has integrations for GitHub, BitBucket, and Jenkins. You can find a sample GitHub action in the .github directory in this repo.
With Signadot Sandboxes, you can test new microservice-based features against a running baseline environment without having to spin up a new stack. This allows you to iterate faster and at a fraction of the cost. To learn more about Signadot, please see the documentation.
Get the latest updates from Signadot

