Discover how Signadot sandboxes can revolutionize your API testing process. This tutorial walks you through setting up a sandbox environment, making changes to an existing API, and understanding the downstream effects of these changes. Learn how to preview your API changes with real data and live microservices, all from a single code branch.
Microservices underpin almost all modern web services. A single product might have dozens of APIs feeding directly into its frontend, or into other services.
Testing and updating the functionality of these APIs is fraught with challenges. Doing so usually requires spinning up entire testing or staging environments replete with all other microservices and data. This doesn’t scale and takes significantly longer for, what might be minor, API changes.
Signadot sandboxes allow you to preview your API changes with real data and using all other live microservices, all from a single code branch.
Here we want to take you through setting up a sandbox environment to make a change to an existing API and understand the downstream effects of the change.
By the end of this tutorial you will have:
Let’s get started.
Let’s first setup our Signadot account and the prerequisites needed. If you haven’t already, you can create a Signadot account here.
To run through this tutorial, you’ll need:
Once you have each of those installed, head to your Signadot dashboard and to ‘Clusters’ and ‘Connect Cluster.’ Choose a name (here we’re using ‘ms-cluster’). Take note of the Token value that is shown on the next page as you’ll need it for the next step (once you close this page, it won’t be shown again).
Then run these commands:
`kubectl create ns signadot kubectl -n signadot create secret generic cluster-agent --from-literal=token='' helm repo add signadot https://charts.signadot.com helm install signadot-operator signadot/operator`This will create a ‘signadot’ namespace for your kubernetes cluster, connect to your Signadot cluster via the token and start up the Signadot operator.
If all is good you can run:
$ signadot cluster list
The output should show your cluster connected:
`NAME CREATED OPERATOR VERSION your-cluster 2023-03-24T14:55:17Z 0.11.1`Your cluster and environment is all set up and we can start to deploy our app.
For this tutorial, we’ll be using this microservices demo application. This was originally designed by Google to “showcase Kubernetes, Istio, and gRPC.” It has multiple microservices all within a single app, so is ideal for testing API applications.
First clone the repo:
gh repo clone signadot/microservices-demo
Then cd into the directory:
cd microservices-demo
(Note: If you are deploying on an Apple Silicon Mac, the main branch won’t work as it is tied to Intel. Instead, you can switch to the cewkrupa/update-for-m1-arch branch)
The manifests for building the images are ready to go, so we can build the application using skaffold:
skaffold run
This may take a few minutes. Once it has completed, you can start to see each of the services spooling up:
kubectl get pod
Once you have two containers working per pod (the Signadot Operator automatically creates sidecar containers to proxy requests to the appropriate sandboxes), you can run:
kubectl port-forward svc/frontend 8080:80
Which starts the server and forwards to the 80:80 port on localhost. Open this up in a browser and you’ll see what’s been launched:

We have our very own online boutique. Go ahead and use it, add some products to your cart and checkout so you get a feel for the correct functionality.
Now let’s start breaking it.
Now we are ready to start making changes to our microservices. Here we’re going to modify our APIs to make a change to an existing API. First, we’ll ‘accidentally’ break a component of our checkout service.
We’ll first switch to a new branch:
git checkout -b updating-checkout-api
In this case, we’re going to mimic an engineer removing part of the response for our checkout API. Usually this API returns when a customer checks out with the order ID, shipping and total costs, items, and shipping address. It’s now going to miss the order ID. So what was:
`orderResult := &pb.OrderResult{ OrderId: orderID.String(), ShippingTrackingId: shippingTrackingID, ShippingCost: prep.shippingCostLocalized, ShippingAddress: req.Address, Items: prep.orderItems, }`Becomes:
`orderResult := &pb.OrderResult{ ShippingCost: prep.shippingCostLocalized, ShippingAddress: req.Address, Items: prep.orderItems, }`This engineer isn’t completely crazy so they, wisely, decide to spin up a sandbox to test what happens. First, they have to build a new docker image for this service:
docker build -t {docker_username}/{docker_repo}:break-checkout src/checkoutservice Where {docker_username} is your docker username and {docker_repo} is the docker repository you created.
You can then push this to a remote repo:
docker push {docker_username}/{docker_repo}:break-checkout
Then create a sandbox spec as a yaml file in the .signadot directory with the correct information:
`name: '@{name}' spec: description: Breaks checkout service cluster: {your_cluster} labels: branch: "break-checkout" forks: - forkOf: kind: Deployment name: checkoutservice namespace: default customizations: images: - image: {docker_username}/{docker_repo}:@{checkout-tag} defaultRouteGroup: # CLI v0.3.7+ required (see sandbox specification for details) endpoints: - name: checkout-endpoint target: http://checkoutservice.default.svc:5050 - name: frontend-endpoint target: http://frontend.default.svc:80`You’ll need to add {your_cluster}, but @{name} and @{checkout-tag} will be created automatically.
You can then create a sandbox with:
signadot sandbox apply -f ./signadot/checkout.yaml —set name=checkout —set checkout-tag=break-checkout
This will take just a few seconds to create a sandboxed version of the new checkout service code on Signadot. Once done it will return a link to the dashboard for this specific sandbox and two endpoints:
SANDBOX ENDPOINT TYPE URL
checkout-endpoint host https://checkout-endpoint—checkout.preview.signadot.com
frontend-endpoint host https://frontend-endpoint—checkout.preview.signadot.com
These are the endpoints you can use to test your changes.
First, we’ll use the frontend-endpoint. You can open this in a browser and you’ll immediately see it is a version of our online boutique. Go ahead do as you did before–add some products to your cart and checkout.
Womp womp.
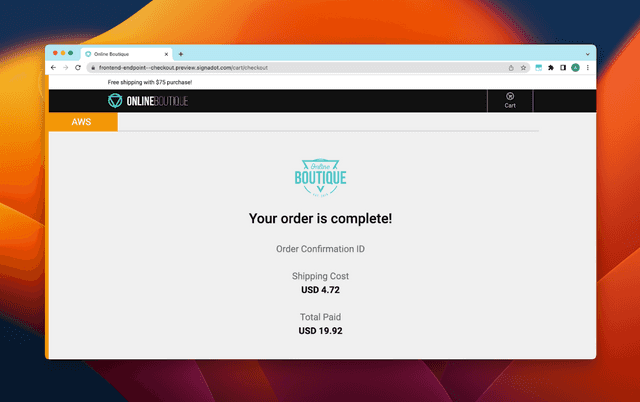
You broke it. Let’s see why.
The checkout-endpoint can be used within an API testing platform, such as Postman. You can make gRPC calls within Postman by going to File -> New… and selecting ‘gRPC request.’
You can use your API key again here by selecting ‘API Key’ in the Authorization tab, adding ‘signadot-api-key’ as the key and your API key as the value (also click on the padlock in the URL bar to enable SSL). Paste your checkout-endpoint into the URL bar and change the ‘http’ to ‘grpc’.
You should add the demo.proto file (in the pb directory in the repo) as the API definition. This will allow you to select the right call to make and to use example messages. Here we’ll use the “CheckoutService / PlaceOrder” call. When we invoke this with the example message, we get:
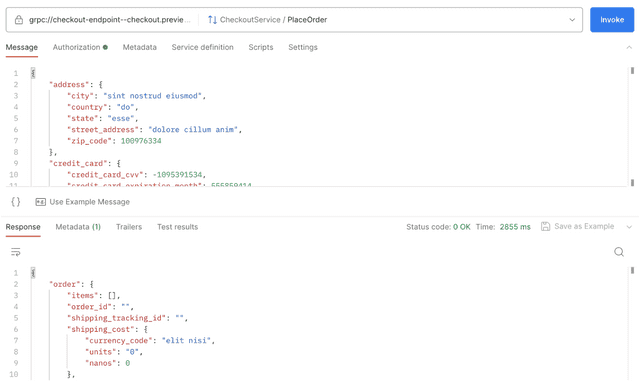
Well, there’s your problem. You can see we have no data in our response, and somewhere this is causing the frontend to fail.
Since the Sandbox runs in the cluster, this API call on the checkout service is from a live version. This means it has access to other dependencies, like the payment service and shipping service. It’s not mocking these dependencies. This means that, as a developer, you don’t need to worry about maintaining these mocks.
The resolution is easy. Just re-add the data to the orderResult object:
orderResult := &pb.OrderResult{
OrderId: orderID.String(),
ShippingCost: prep.shippingCostLocalized,
ShippingAddress: req.Address,
Items: prep.orderItems,
}
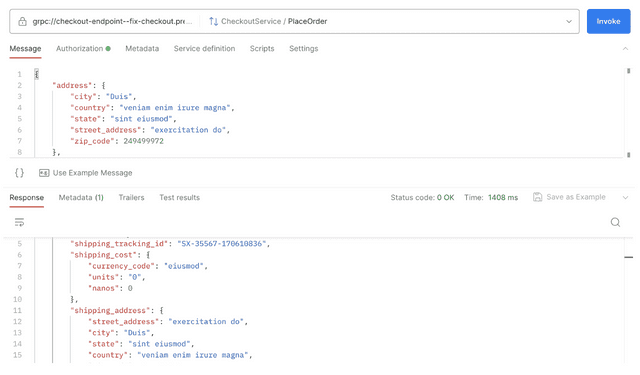
Then rebuild and reapply to the sandbox.
docker build -t {docker_username}/{docker_repo}:fix-checkout src/checkoutservice
signadot sandbox apply -f ./signadot/checkout.yaml —set name=checkout —set checkout-tag=fix-checkout
And the API response is back to normal:
Note though, you didn’t actually break anything. Your original version is still up and running in the cluster, you haven’t committed any code. The whole idea of the sandbox is to test breaking changes like this without really breaking anything. You don’t have to rebuild/reapply. You can just go back to git main and act as if nothing happened (because it didn’t).
Though this tutorial you have:
All this while continuing to use all other services in the cluster. You can see it’s extremely easy to spin up ephemeral test environments for microservice endpoints. You can safely test any change, big or small, quickly and know you aren’t impacting the rest of the team.
Get the latest updates from Signadot

