Testing SQS-based microservices is difficult when shared environments get in the way. This guide shows how to use Signadot Sandboxes with Minikube to isolate producers and consumers, safely route messages, and even explore the SNS-to-SQS fanout pattern—all while iterating quickly and validating changes before merging.
Welcome to the SQS + Signadot Sandboxes tutorial! In this guide, you’ll learn how to quickly test new versions of SQS-based microservices—either in a pull request or during local development—by leveraging Amazon SQS integration running in a Minikube cluster, with a brief look at the SNS-to-SQS fanout pattern for broader message distribution. This setup enables you to:
What you’ll learn:
Before you begin, ensure you have the following prerequisites set up:
minikube start —-driver=Dockereval $(minikube docker-env) kubectl cluster-infoHere is a more detailed explanation of the project’s folder structure, elaborating on the purpose of each directory and file and how they contribute to the overall application.
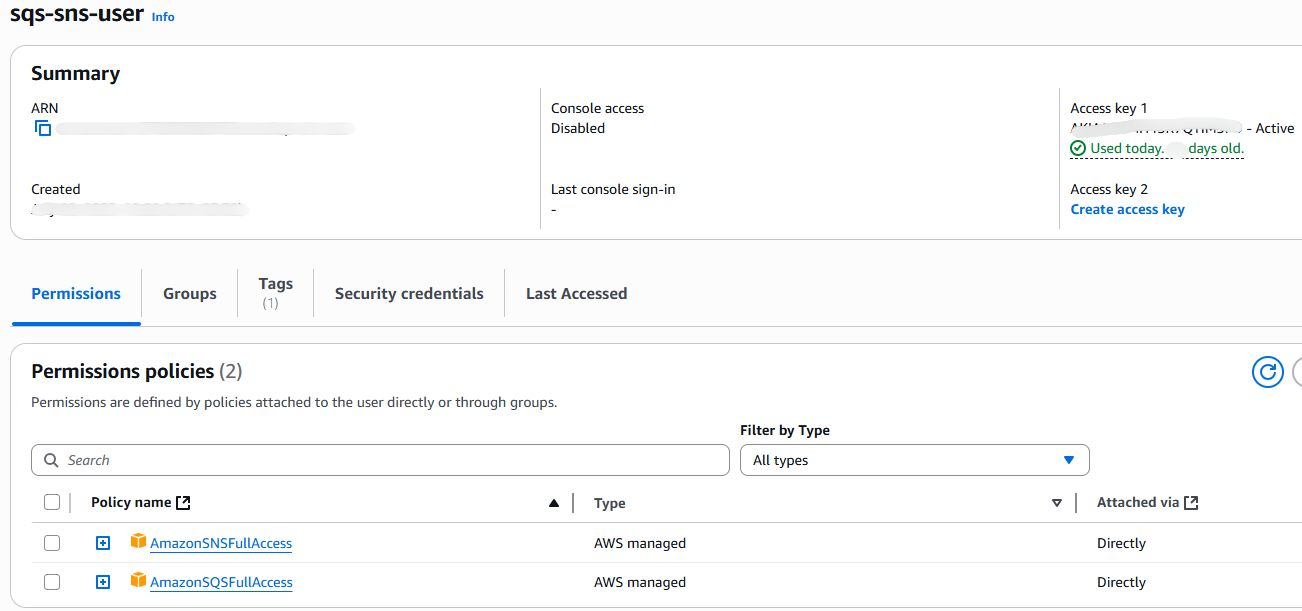
As you can see, The image below shows sqs-sns-user IAM user information and permission policy AmazoneSNSFullAccess, AmazoneSQSFullAccess that allows access to AWS SNS & AWS SQS services.
Hooray! 🎉 We’ve finished all the setup needed to get our project up and running — now it’s time to fire it up and see it in action!
First, you need to build the Docker image. The image we’re creating, sqs-signadot, is a simple demo application that we’ll use to showcase the Shared SQS & SNS + SQS fan-out pattern.
To build the image, run:
Verify the docker images in your docker repository inside minikube.
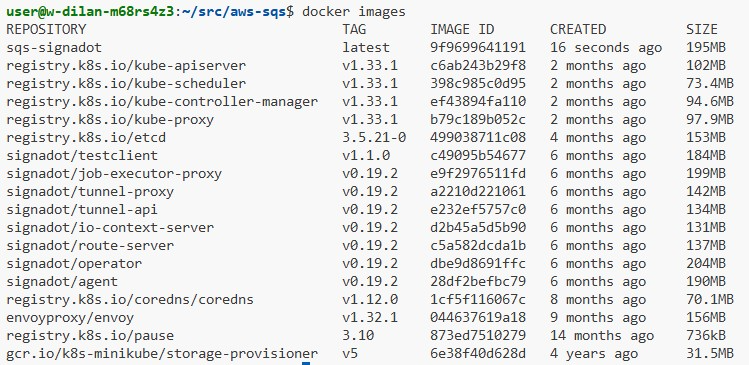
Whoo! 🎉 The build is successfull. sqs-signadot image exists in docker image repository.
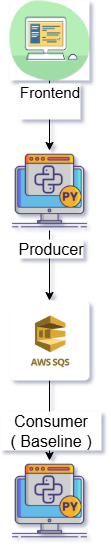
These simple steps will deploy the demo app that consists of Frontend, Producer & Consumer services to set up baseline flow of the AWS SQS & SNS with Signadot integration.
Following services been deployed :
Lets check everything work as expected :
Next, The tunnel is going to be established by Signadot, so that all in-cluster services are made available locally. To create config.yaml refer https://www.signadot.com/docs/getting-started/installation/signadot-cli#local-configuration
Use the output of the following command as the value for kubeContext.
Note: The config.yaml file path should be ~/.signadot/config.yaml
As you can see, Signadot local connect is exposing your services to your host machine, The frontend-service is exposed at http://frontend-service.aws-sqs-app:8080 to interact with web GUI.
In the cloud native world the ability to make infrastructure provision automation would be amazing. By compiling these amazing concepts below code shows how the SQS queue and SNS topic can be created by code itself when producer or consumer service startup.
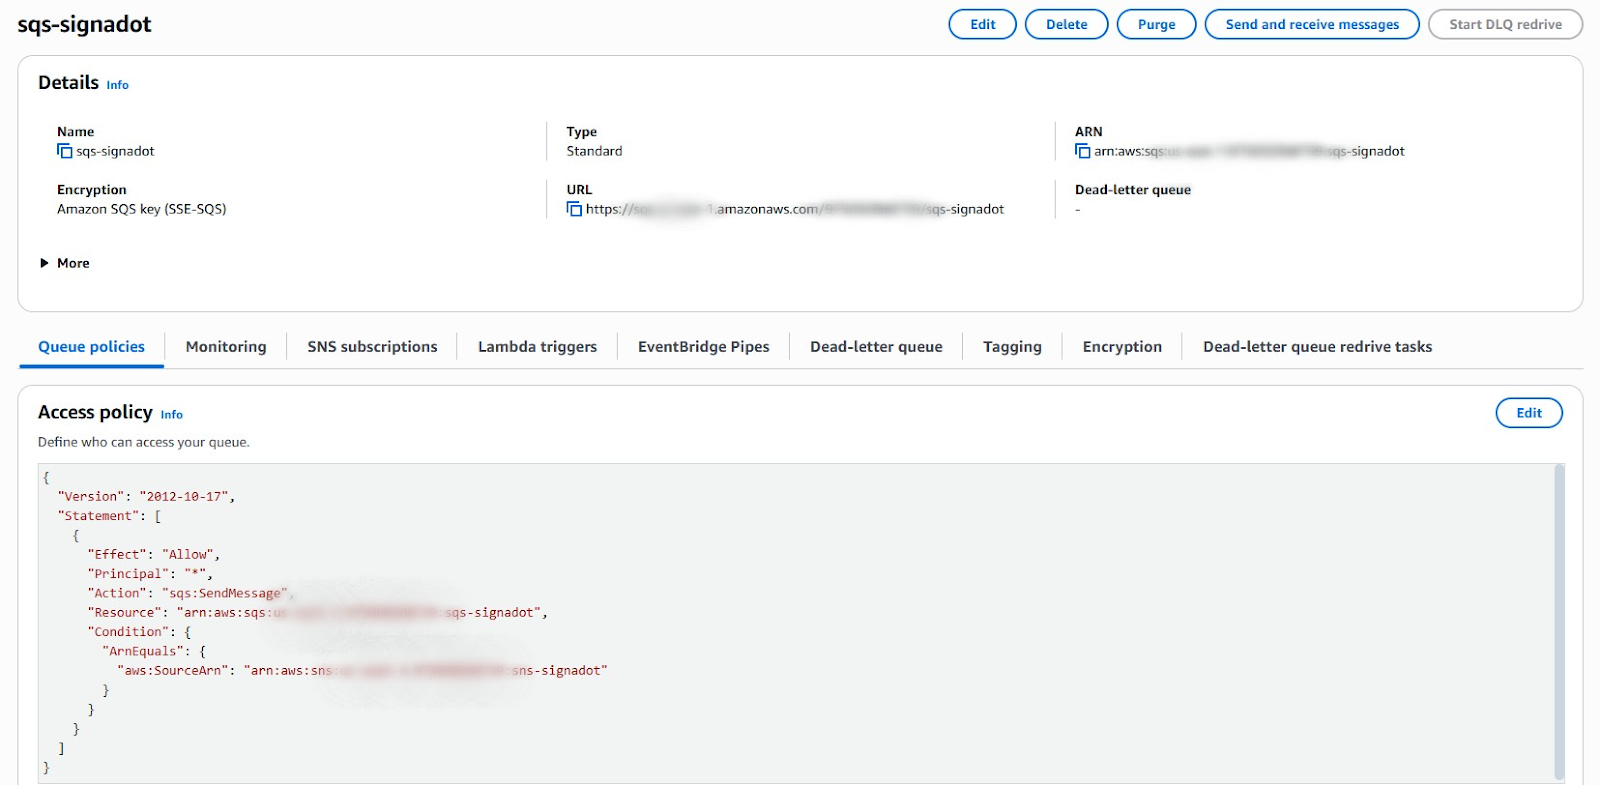
This image shows the SQS queue being created and how it’s showing in the AWS console. Additionally the Access Policy is being created to work with SNS to SQS Fanout pattern.
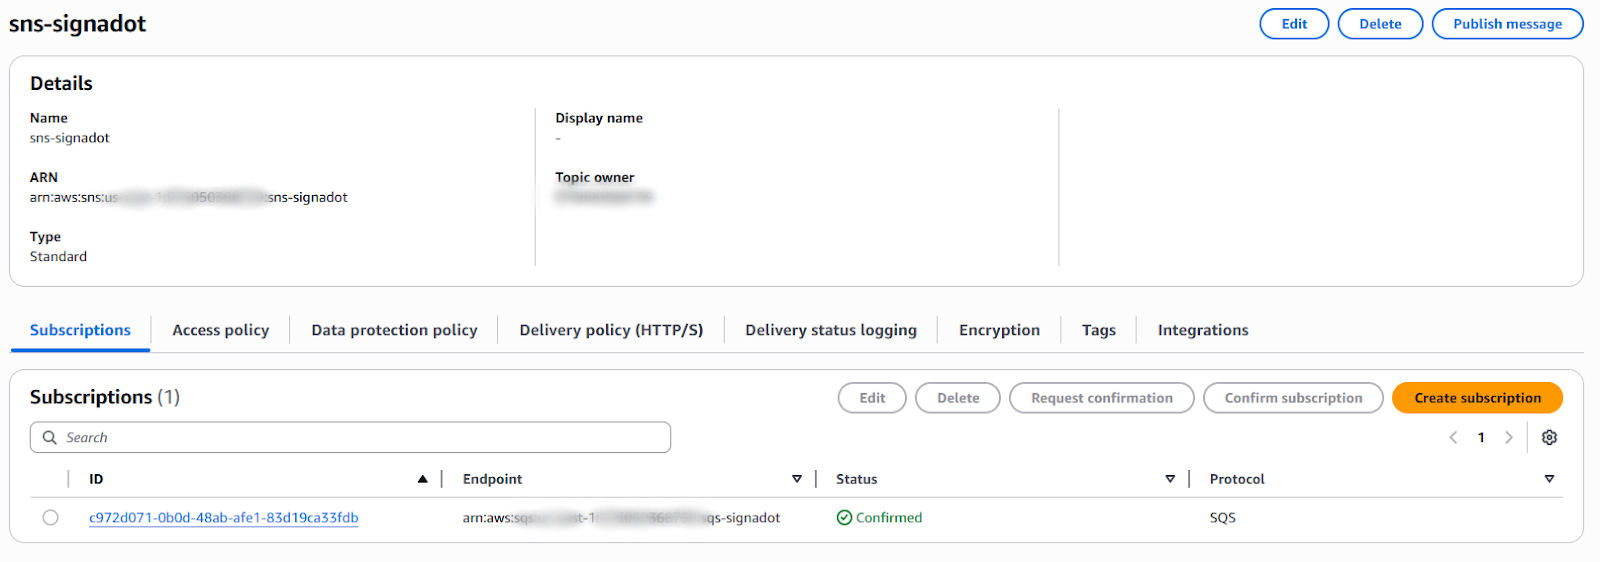
The image below shows an AWS SNS topic with an SQS queue subscribed to it. We’ll be using this setup to demonstrate how the SNS + SQS fan-out pattern works in practice.
The architectural flow of the baseline message processing diagram.
The code below shows how the producer has done his job to publish a message to the AWS SQS queue.
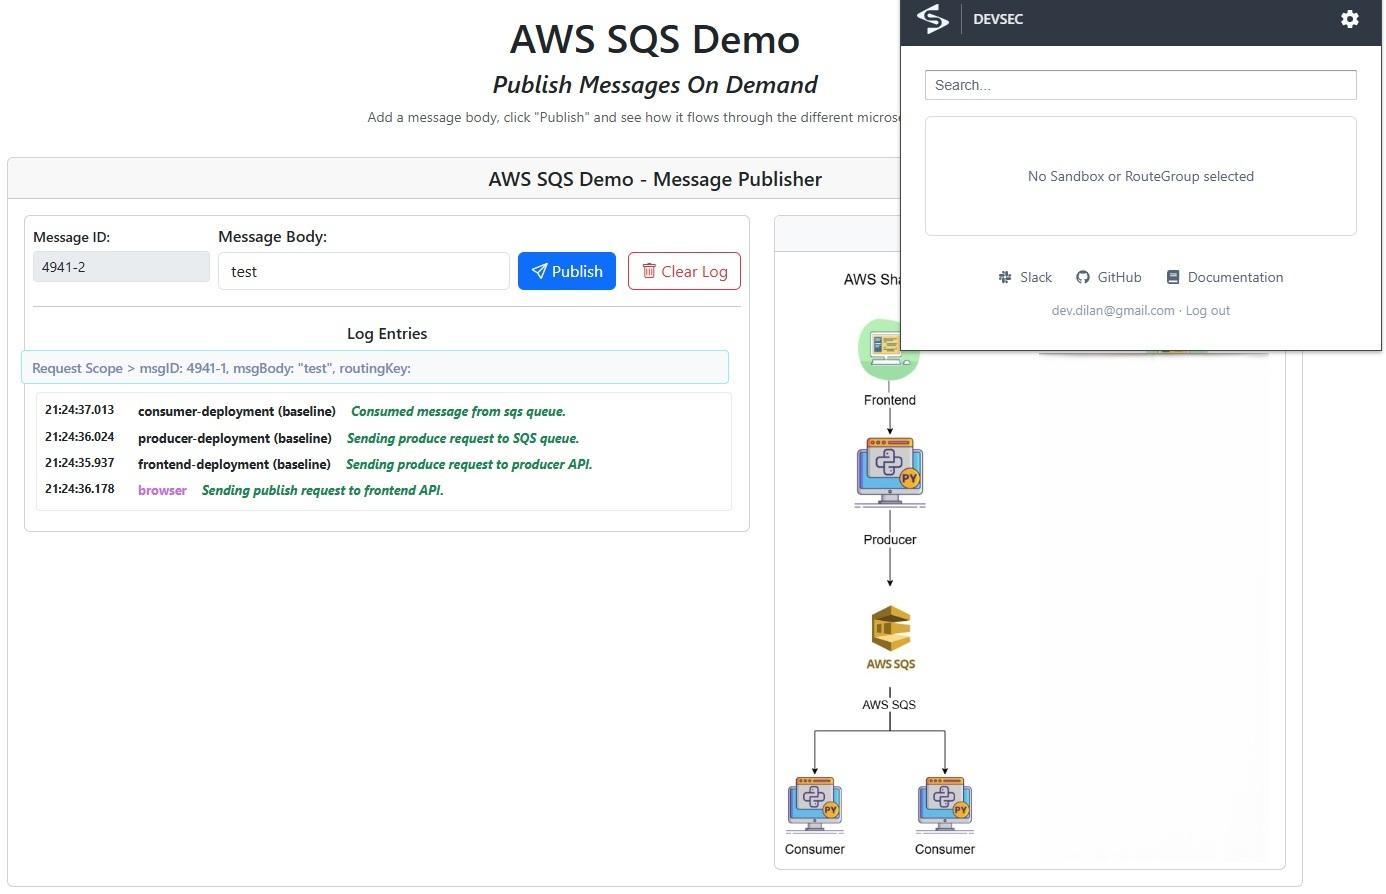
Head over to http://localhost:8080 in your browser to use the AWS SQS demo frontend and send a message. With no sandboxes set up yet, the baseline consumer will pick it up, and you can watch it appear in the frontend interface, just like in the screenshot below.
Our next step is to explore consumer sandbox testing. Having demonstrated the basic message flow between producer and consumer services in our demo application, we now need to address a critical development challenge: how to rapidly test new versions of producer and/or consumer code without disrupting shared testing environments.
Our goal is to create an isolated testing environment where developers can validate changes before merging. We’ll accomplish this by:
Using OpenTelemetry auto-instrumentation to propagate request headers - ensuring context flows seamlessly from producers through the messaging system to consumers
Implementing selective routing based on header values - directing traffic to sandboxed versions of services when specific headers are present
Deploying new service versions using Signadot sandboxes - creating isolated environments for testing code changes from dev branches or local workstations
This approach will enable you to test new consumer logic, producer modifications, or both simultaneously in a controlled sandbox environment. Let’s walk through each step:
How OTel auto-instrumentation propagate headers without modifying application code.
When you build the container image using docker build, the Dockerfile will install the required packages to implement OTel auto-instrumentation.
After that the Fastapi services ( Both Frontend & producer ) are powered up with Otel automatic header context propagation through the command below.
A Signadot sandbox is an isolated, short-lived environment that lets you safely test code changes without impacting test environment traffic.
What does consumer will do in the sandbox:
Instantiate Dedicated Subscribers for Each Sandbox - so their consumption offsets remain isolated.
Filter Out Irrelevant Messages Using the Routes API - based on routing key evaluation via the Routes API.
Preserve Context by Propagating the Routing Key Downstream - by including the routing key when the subscriber communicates with other services or message flows
Let’s take a look at how the router api periodically fetches routing keys in the consumer sandbox.
The thread that is running in the background to keep the router api stay alive. Meanwhile _periodic_cache_updater routine fetches the routing keys with 05 sec period manner.
How to extract the OTEL baggage header inside the consumer code
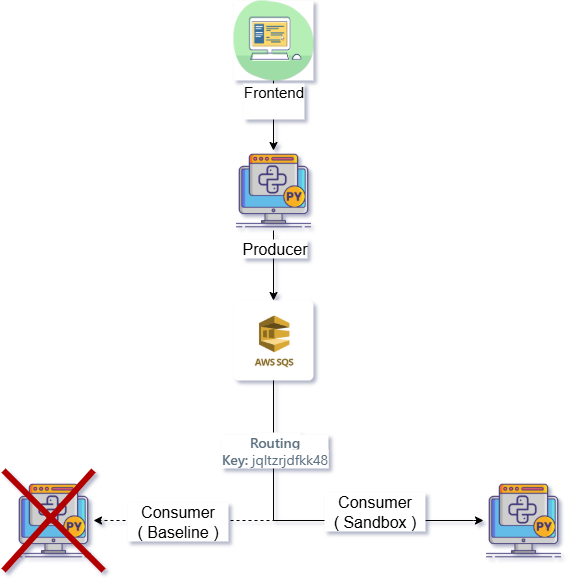
And here’s where selective consumption comes into play. At this stage, the consumer checks the routing key of each message against its own sandbox routing key using the Routes API. If it’s not a match, the message is skipped and immediately released back into the queue, reducing its visibility in this sandbox and making it instantly available for the correct sandbox’s consumer. This guarantees isolation while keeping message delivery fast and efficient.
To create the consumer sandbox lets go to build a sandbox configuration file.
This YAML tells Signadot:
Create me a sandbox called sqs-counsumer-sandbox in my cluster, fork the consumer-deployment from aws-sqs-app namespace, set an environment variable to indicate the sandbox name.
Lets apply the sandbox configuration:
Note: To run the following command, you have to install the signadot CLI tool on your local machine.
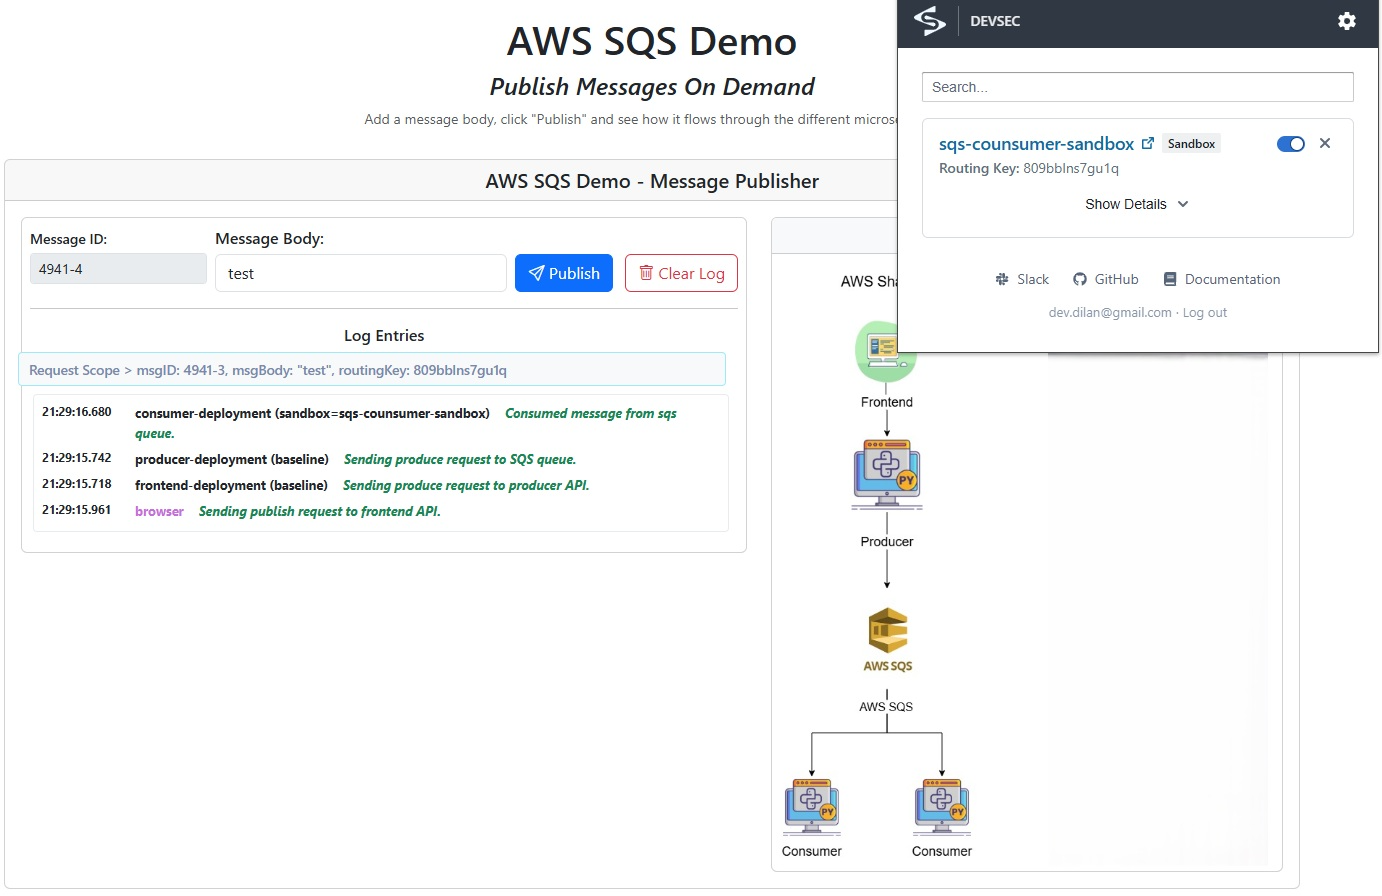
As you can see the sandbox called sqs-counsumer-sandbox-dep-consumer-deployment-
7ca2ec39-cc4dfw2p has been created and the age of the pod shows as 61 seconds.
Below diagram will illustrate how the routing key works.
Select the sqs-consumer-sandbox after enabling Signadot’s browser extension.
In the next section, building upon the shared SQS pattern, the focus shifts to the SNS-to-SQS Fan-out pattern. For simplicity, instead of creating ephemeral queues, the behavior of this pattern will be demonstrated using an existing queue, with multiple consumers sharing that queue and coordinating message handling in the same way as with plain SQS.
Another option with SNS/SQS is to give each consumer its own queue, where every consumer receives a full copy of the messages. In this case, queues may be created dynamically, and consumers apply selective logic in their code to drop messages not intended for them.
The https://aws.amazon.com/getting-started/hands-on/send-fanout-event-notifications/ elaborate the implementation of SNS + SQS Fanout pattern with ephemeral SQS Queue.
To avoid repetition with consumer sandbox, the sandbox boilerplate won’t be revisited here; however, a few key points will be highlighted to ensure clarity and prevent any confusion.
Lets provision the sandbox:
Create Signadot Router Group to control how traffic is routed into sandboxes.
The router group lets you route network traffic from one or more sandboxes to one or more endpoints based on label selectors. It acts like a traffic router or load balancer within your Signadot sandboxes and Kubernetes clusters.
Lets provision the router group:
The diagram illustrates how the message will flow in scenario 1.
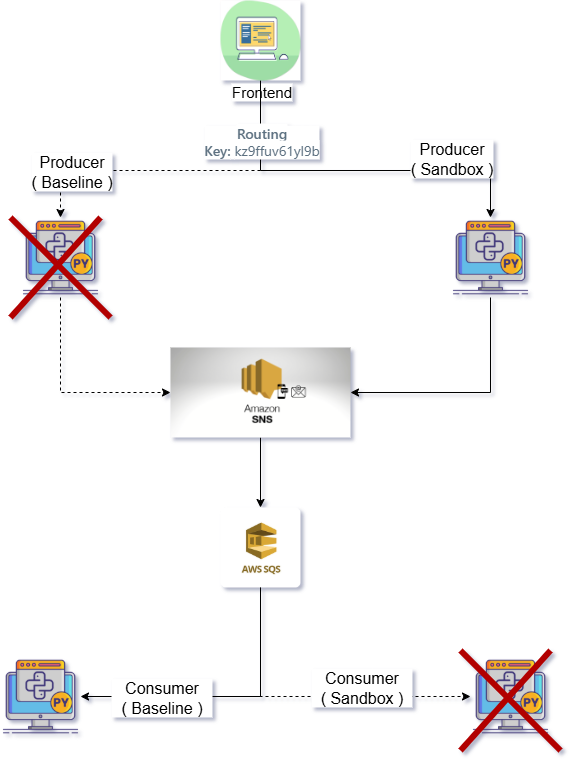
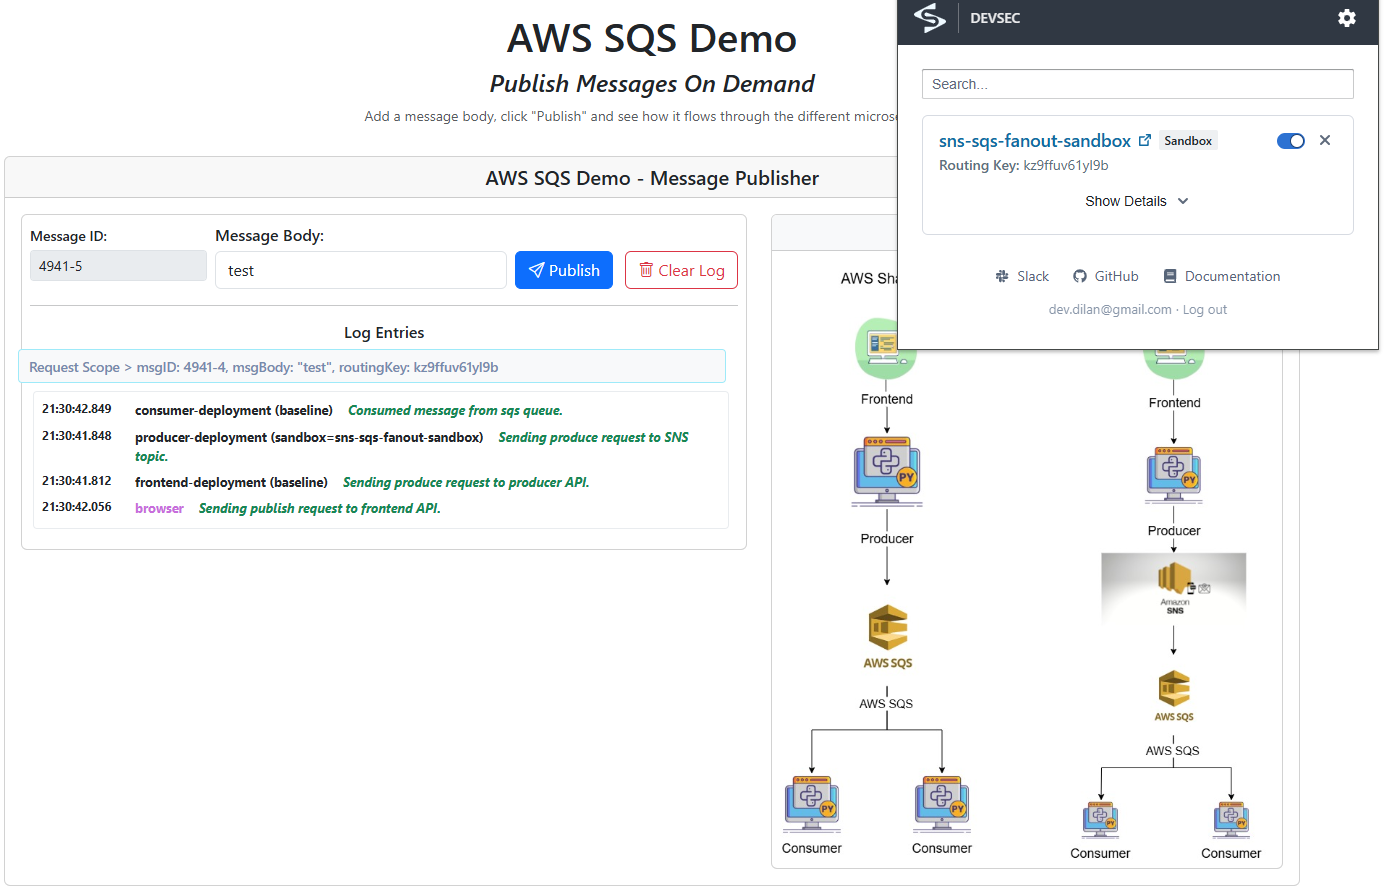
As you can see the request has been sent through the producer sandbox. Which has published the message to AWS SNS topic and consumed by baseline consumer.
Another diagram that illustrates the message flowing behavior in scenario 2.
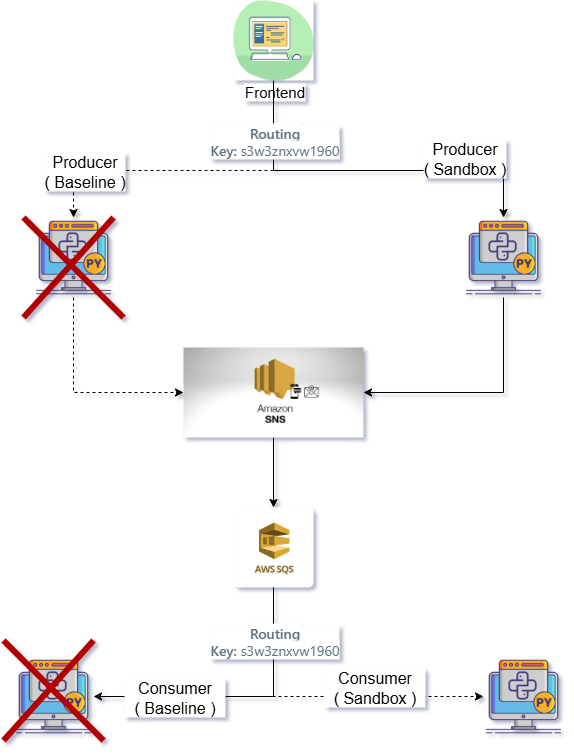
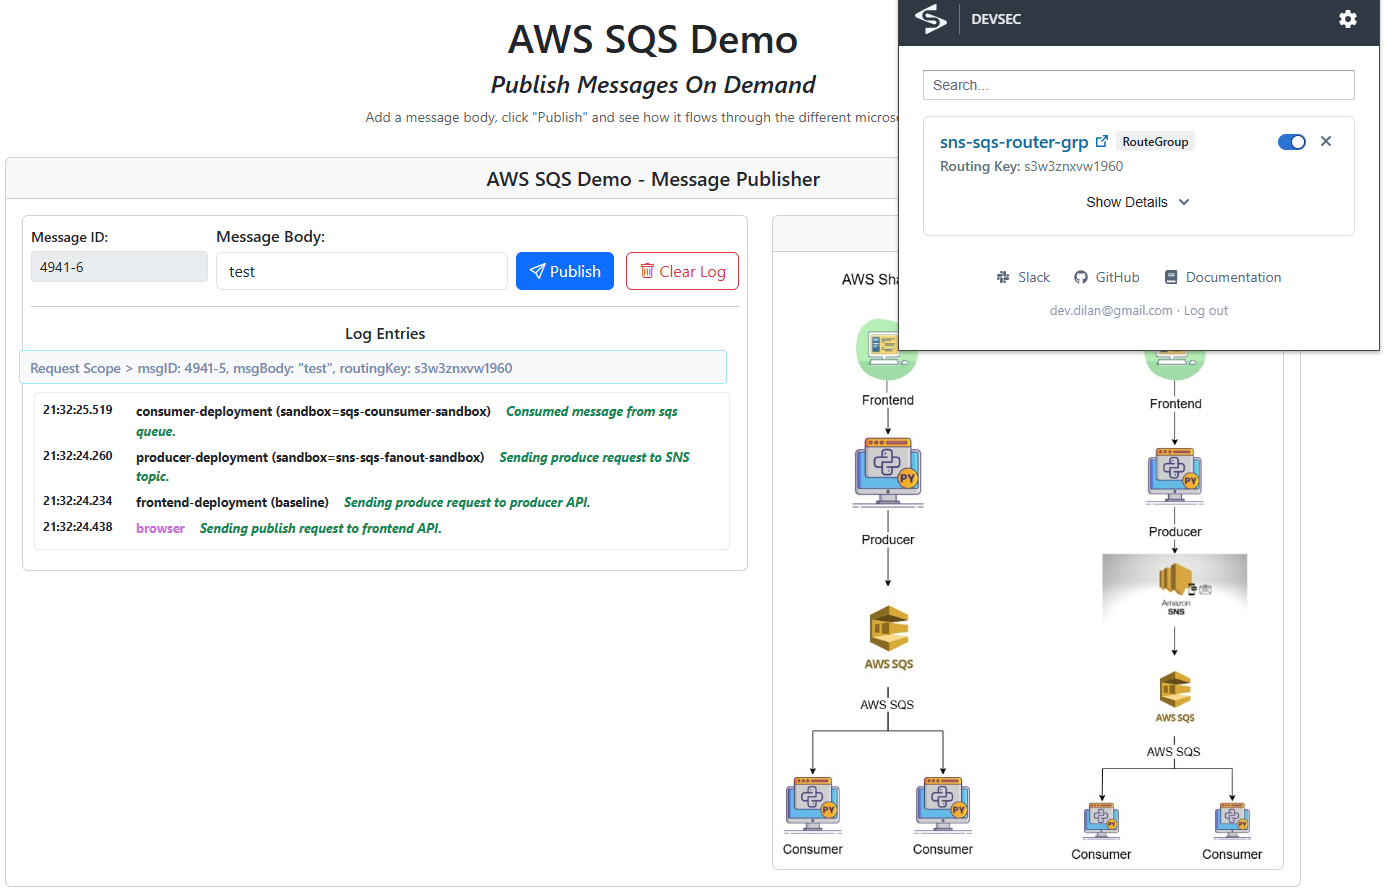
As you can see the request has been sent through the producer sandbox. Which has published the message to AWS SNS topic and consumed by sandbox consumers.
In this tutorial, you learned how to use a shared Amazon SQS queue with Signadot Sandboxes to quickly test new message processing logic in an isolated Minikube environment. We demonstrated deploying baseline services, safely routing messages through the shared queue, and using sandboxes to validate changes without disrupting the main processing flow. While the focus was on the shared-queue pattern, we also touched on how the SNS-to-SQS fanout pattern can broadcast messages to multiple queues for broader testing scenarios.
This approach enables faster iteration and more reliable integration testing for event-driven microservices architectures, offering:
Realistic message flow simulation with shared SQS queues.
Safe isolation for experimental consumers in sandboxes.
Compatibility with fanout-based testing via SNS-to-SQS.
Reduced risk when validating new logic alongside live-like traffic.
Get the latest updates from Signadot

