Neon
kubectlandminikubeinstalled- A Neon account with an API key
- The
neonctlCLI installed and authenticated - A Signadot account with the operator installed in your cluster
- The
signadotCLI installed and authenticated
Overview
Ephemeral sandbox environments solve many problems for microservices teams. You can spin up an isolated copy of your service, test your changes, and tear it down. No conflicts with other developers. No waiting for a shared staging slot.
But here's the catch: your sandbox service still connects to the same staging database as everyone else. One developer's test writes pollute another's queries. Schema migrations break active tests. Seed data disappears mid-run. The application layer is isolated, but the data layer is not.
This guide shows you how to fix that problem. You will combine Signadot Sandboxes with Neon's database branching to create true full-stack isolation. Every sandbox gets its own application fork and its own database branch. When the sandbox dies, the database branch dies with it.
What You Will Build
The end-to-end system works as follows:
- A developer creates a Signadot Sandbox
- A Resource Plugin automatically creates a Neon database branch and exposes the connection string as an output
- The sandbox pod starts with a connection string pointing to the isolated branch
- The developer runs tests against isolated data
- The developer deletes the sandbox
- The Resource Plugin deletes the Neon branch automatically
No shared state. No test pollution. No manual cleanup scripts.
How It Works
The architecture relies on two key technologies working together.
Neon Database Branching: Neon uses copy-on-write storage to create instant database branches. A branch inherits all schema and data from its parent but operates independently. Writes to a branch don't affect the parent, and branches can be created or deleted in seconds with minimal storage overhead.
Signadot Resource Plugins: Resource Plugins extend Signadot's sandbox lifecycle with custom provisioning logic. When a sandbox starts, the plugin runs a create workflow. When the sandbox terminates, the plugin runs a delete workflow. Outputs from the create workflow (like connection strings) can be injected directly into sandbox pods.
Baseline Environment
We'll set up a users microservice connected to a Neon database, then demonstrate how sandboxes can get isolated database branches.
Step 1: Clone the Example Repository
The example repository contains a pre-built users microservice and all necessary Kubernetes manifests:
mkdir -p ~/git/signadot/
cd ~/git/signadot/
git clone https://github.com/signadot/examples.git
cd examples/neon-branching-tutorial
Step 2: Set Up the Neon Database
Create a Neon project:
neonctl projects create --name users-demo
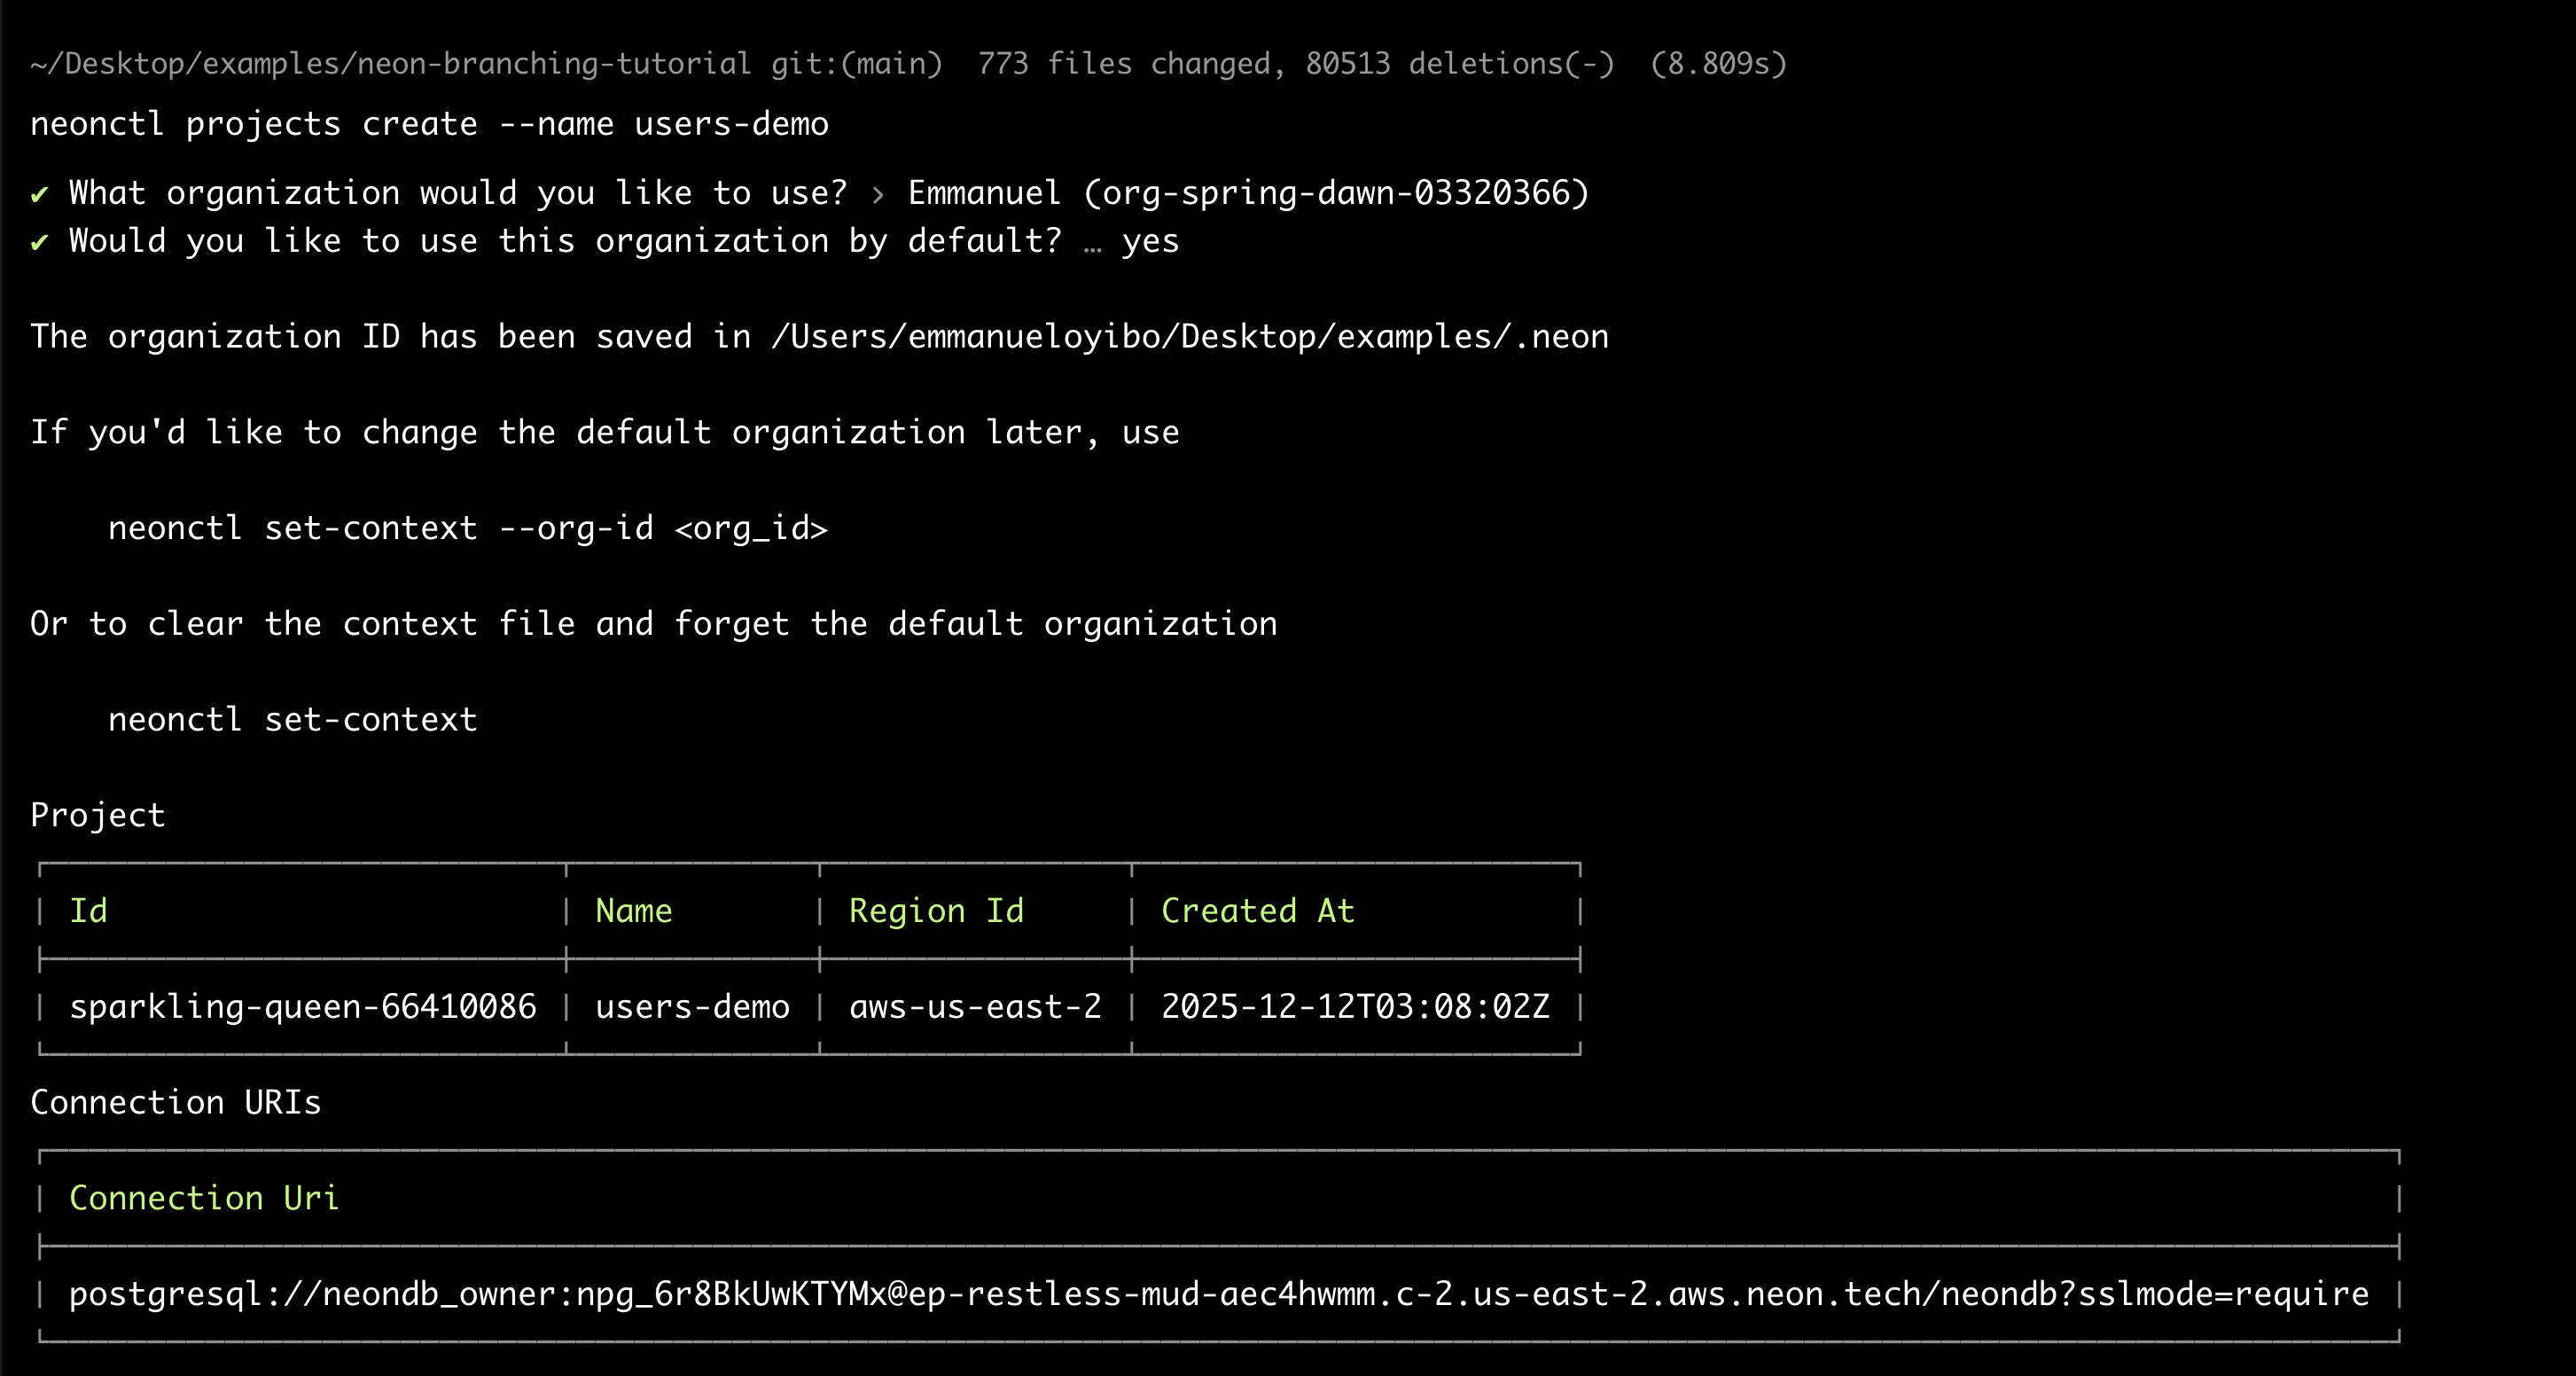
Note the project ID from the output (e.g., sparkling-queen-66410086). You'll need it throughout this tutorial.
Retrieve the connection string and create the schema:
neonctl connection-string main \
  --project-id <your-project-id> \
  --database-name neondb
Connect to the database and run the schema file:
psql "<connection-string>" -f schema.sql
The schema.sql file creates a users table and inserts three seed records. Every sandbox branch will inherit this data.
Generate an API key for the Resource Plugin:
- Go to the Neon Console
- Navigate to Account Settings > Personal API keys
- Click Create new API key and save it securely
Step 3: Deploy to Minikube
Start minikube and build the demo image:
minikube start

eval $(minikube docker-env)
make build
Create the required secrets:
make setup-db-secret      # Enter your Neon connection string when prompted
make setup-neon-secret    # Enter your Neon API key when prompted
Deploy the baseline service:
make deploy
Verify the deployment:
kubectl get pods -l app=users-service

You should see pods in Running state with 2/2 containers (the service plus the Signadot routing sidecar).
Step 4: Install the Resource Plugin
The Resource Plugin bridges Signadot and Neon. Take a look at neon-branch-plugin.yaml:
name: neon-branch
spec:
  description: Creates and deletes Neon database branches for sandbox isolation

  runner:
    image: node:20-alpine
    namespace: signadot
    podTemplateOverlay: |
      spec:
        containers:
          - name: main
            env:
              - name: NEON_API_KEY
                valueFrom:
                  secretKeyRef:
                    name: neon-api-credentials
                    key: NEON_API_KEY

  create:
    - name: createbranch
      inputs:
        - name: project-id
          valueFromSandbox: true
          as:
            env: NEON_PROJECT_ID
        - name: parent-branch
          valueFromSandbox: true
          as:
            env: PARENT_BRANCH
        - name: database-name
          valueFromSandbox: true
          as:
            env: DATABASE_NAME
      script: |
        #!/bin/sh
        set -e
        npm install -g neonctl

        SAFE_NAME=$(echo "${SIGNADOT_SANDBOX_NAME}" | tr -d '-')
        BRANCH_NAME="sandbox${SAFE_NAME}"

        neonctl branches create \
          --project-id "${NEON_PROJECT_ID}" \
          --name "${BRANCH_NAME}" \
          --parent "${PARENT_BRANCH}" \
          --output json > /tmp/branch-output.json

        BRANCH_ID=$(cat /tmp/branch-output.json | grep -o '"id":"[^"]*"' | head -1 | cut -d'"' -f4)

        CONNECTION_STRING=$(neonctl connection-string "${BRANCH_NAME}" \
          --project-id "${NEON_PROJECT_ID}" \
          --database-name "${DATABASE_NAME}")

        mkdir -p /outputs
        echo -n "${BRANCH_NAME}" > /outputs/branch-name
        echo -n "${BRANCH_ID}" > /outputs/branch-id
        echo -n "${CONNECTION_STRING}" > /outputs/connection-string

      outputs:
        - name: branch-name
          valueFromPath: /outputs/branch-name
        - name: branch-id
          valueFromPath: /outputs/branch-id
        - name: connection-string
          valueFromPath: /outputs/connection-string

  delete:
    - name: deletebranch
      inputs:
        - name: project-id
          valueFromSandbox: true
          as:
            env: NEON_PROJECT_ID
        - name: branch-name
          valueFromStep:
            name: createbranch
            output: branch-name
          as:
            env: BRANCH_NAME
      script: |
        #!/bin/sh
        set -e
        npm install -g neonctl
        neonctl branches delete "${BRANCH_NAME}" --project-id "${NEON_PROJECT_ID}"
The plugin has three main sections:
- runner: Uses
node:20-alpinewith the Neon API key injected viapodTemplateOverlay. The runner executes in thesignadotnamespace where the API key secret exists. - create: Installs
neonctl, creates a branch named after the sandbox, retrieves the connection string, and exposes it as an output. The script sanitizes the sandbox name by removing hyphens since Neon branch names work best with alphanumeric characters. - delete: Reads the branch name from the create step's output (using
valueFromStep) and deletes it.
Apply the plugin:
signadot resourceplugin apply -f neon-branch-plugin.yaml
Step 5: Configure the Sandbox Specification
The sandbox spec ties everything together. Review users-sandbox.yaml:
name: "@{sandbox-name}"
spec:
  description: "Users service sandbox with isolated Neon database branch"
  cluster: "@{cluster}"

  resources:
    - name: usersDb
      plugin: neon-branch
      params:
        project-id: "@{neon-project-id}"
        parent-branch: "main"
        database-name: "neondb"

  forks:
    - forkOf:
        kind: Deployment
        namespace: default
        name: users-service
      customizations:
        env:
          - name: DATABASE_URL
            valueFrom:
              resource:
                name: usersDb
                outputKey: createbranch.connection-string

  defaultRouteGroup:
    endpoints:
      - name: users-api
        target: http://users-service.default.svc:3000
The key sections:
- resources: Invokes the
neon-branchplugin with project parameters passed at apply time. - forks: Creates a copy of the
users-serviceDeployment with theDATABASE_URLoverridden. ThevalueFrom.resourcefield references the plugin output directly using the format<step-name>.<output-name>. No intermediate Kubernetes Secret is required. - defaultRouteGroup: Creates a preview URL for accessing the sandboxed service.
Using Sandboxes
Create a sandbox with an isolated database branch:
signadot sandbox apply -f users-sandbox.yaml \
  --set sandbox-name=my-feature \
  --set cluster=<your-cluster-name> \
  --set neon-project-id=<your-project-id>
Verify Branch Creation
Check the Neon branches:
neonctl branches list --project-id <your-project-id>
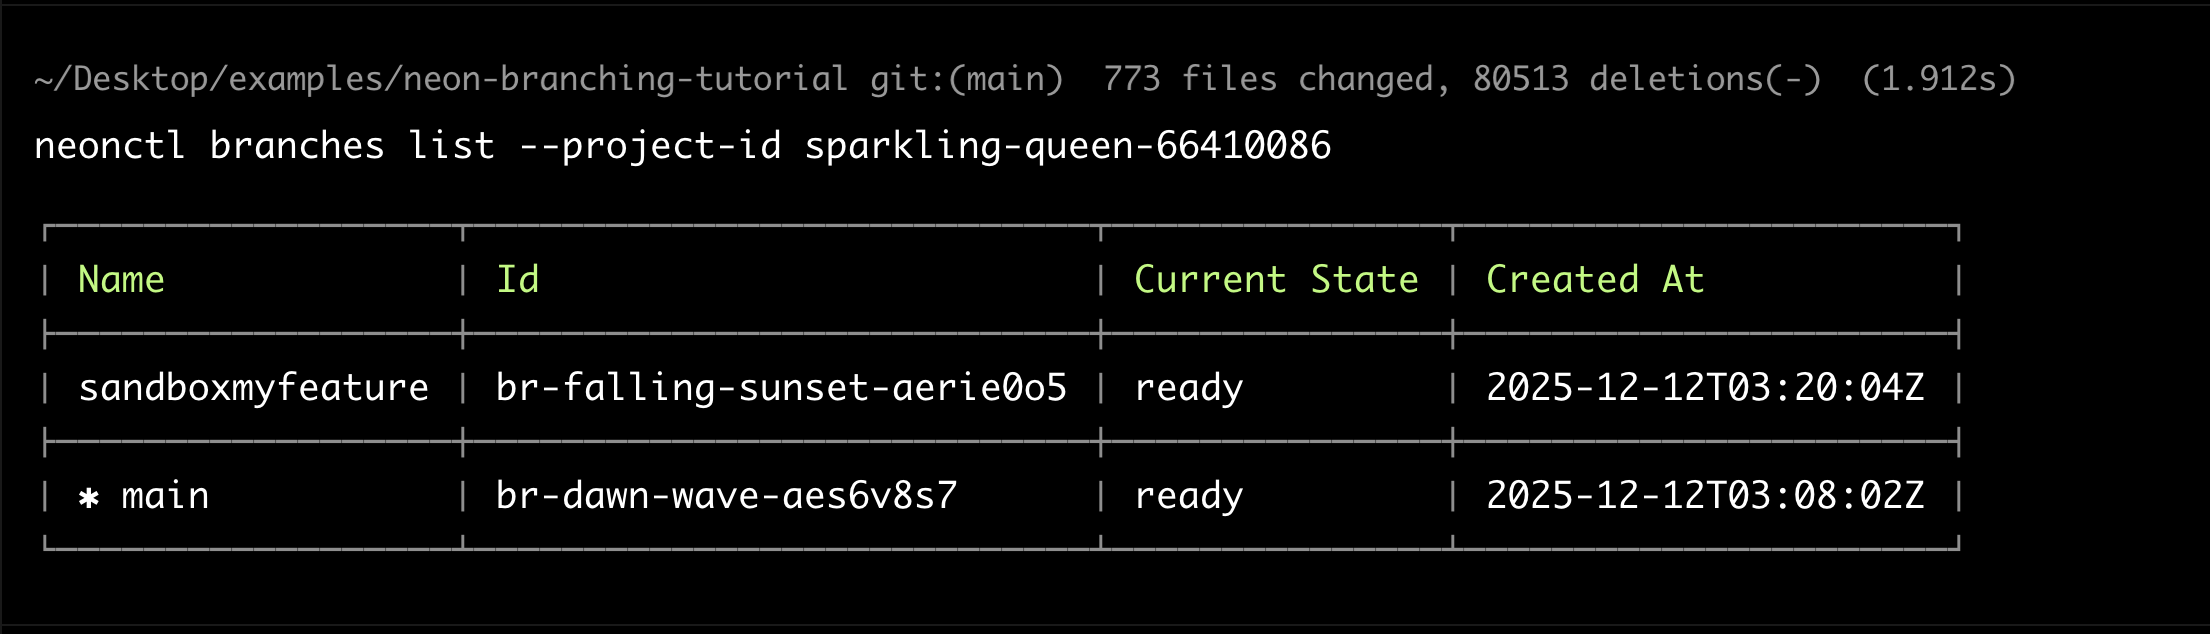
You should see both main and sandboxmyfeature branches.
Test Data Isolation
Query the sandbox endpoint to see the inherited seed data:
curl -H "signadot-api-key: <your-api-key>" \
  "https://users-api--my-feature.preview.signadot.com/users"

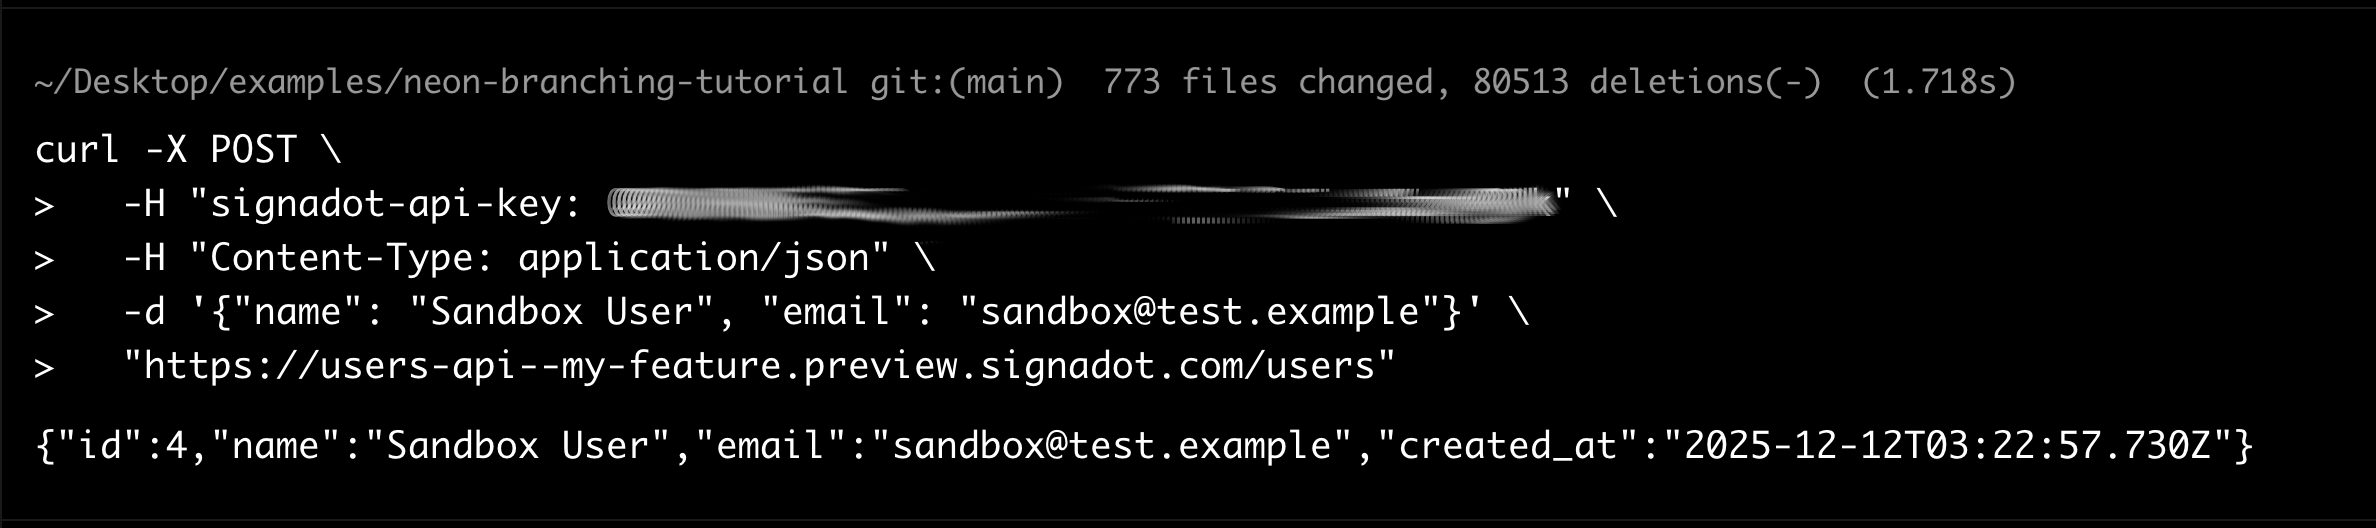
Create a test user in the sandbox:
curl -X POST \
  -H "signadot-api-key: <your-api-key>" \
  -H "Content-Type: application/json" \
  -d '{"name": "Sandbox User", "email": "sandbox@test.example"}' \
  "https://users-api--my-feature.preview.signadot.com/users"
Verify the main branch remains unaffected:
neonctl connection-string main --project-id <your-project-id> --database-name neondb
psql "<connection-string>" -c "SELECT * FROM users WHERE email = 'sandbox@test.example';"

The query returns zero rows. The sandbox user exists only in the branch.
Cleanup
Delete the sandbox:
signadot sandbox delete my-feature
The Resource Plugin's delete workflow automatically removes the Neon branch:
neonctl branches list --project-id <your-project-id>
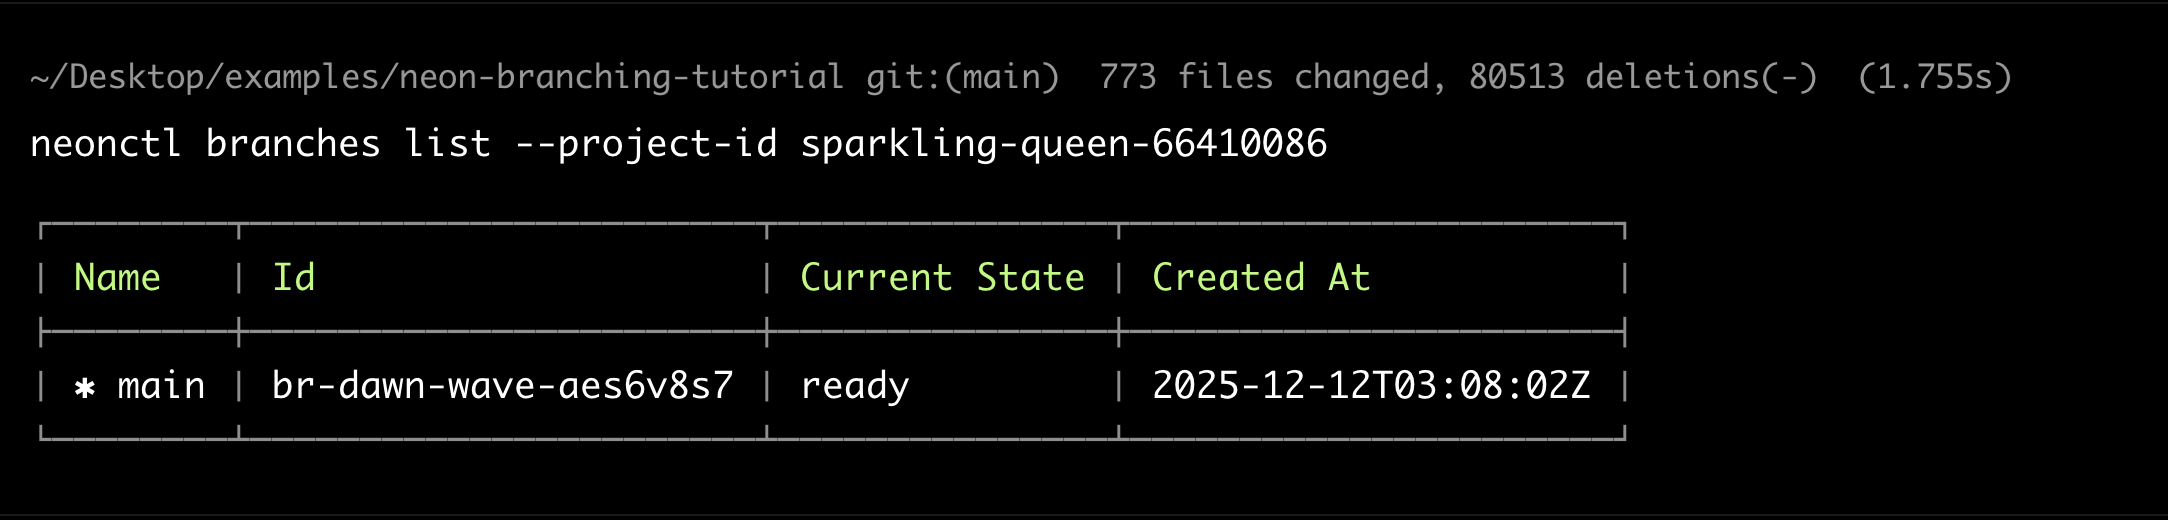
Only the main branch remains.
Conclusion
Each Signadot Sandbox now gets its own forked microservice pods and its own isolated Neon database branch. The Resource Plugin handles the entire lifecycle: creating branches on sandbox creation, exposing connection strings through built-in outputs, and cleaning them up on deletion. Test data cannot leak between sandboxes, and schema migrations in one branch cannot break tests in another.
The cost efficiency makes this practical for everyday use. Neon branches use copy-on-write storage, so you only pay for data that changes. Signadot sandboxes share baseline cluster resources. Branch creation and teardown complete in seconds. Every developer gets an isolated app and database for every pull request.