Testing changes across sandboxes
Overview
In a microservices environment, functionality is often realized across one or more different microservices at different layers of the stack. In this scenario, it proves challenging to preview and test changes to the application end-to-end without either setting up a dedicated environment containing multiple microservices or updating an existing staging environment with the changes.
In both of the above scenarios, there are issues - setting up a fully dedicated environment does not scale and becomes expensive both in terms of and infrastructure & maintenance costs and still may not provide production-like fidelity. Alternatively, using just the shared staging environment often disrupts other teams, not allowing parallelism.
In this guide, we outline how you can preview and test every feature in isolation using Sandboxes.
How Feature Previews work with Sandboxes
To enable Feature Previews, one can make use of Sandboxes and RouteGroups. A typical setup is explained below - assuming there are two microservices, svcA and svcB that are being developed in different repositories and eventually enabling a web application svcF.
In this setup, pull requests on the repositories for svcA and svcB are integrated with Signadot, i.e. the Continuous Integration (CI) pipeline is set up for them such that each Pull Request brings up a Sandbox containing the under-test version of the microservice.
Previewing changes in a single service
Each sandbox for svcA would look as follows:
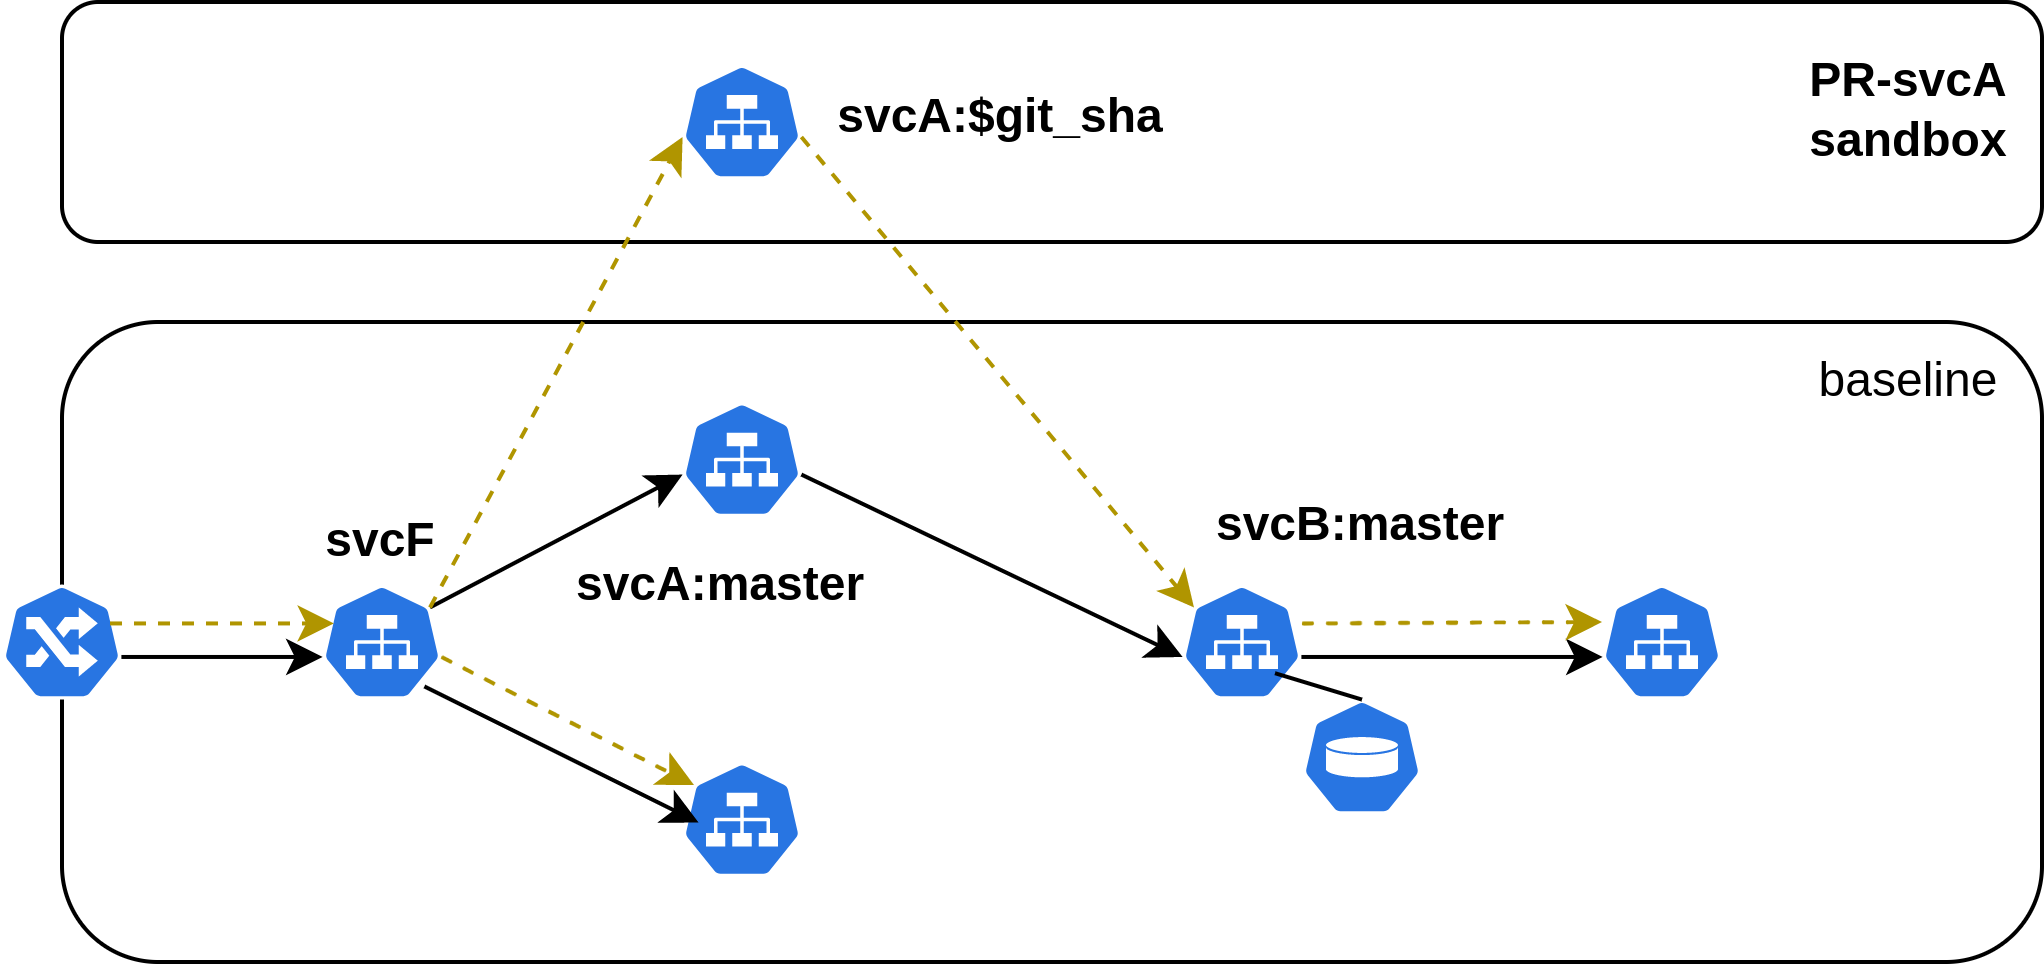
Now, to preview the change, we create a RouteGroup that matches this sandbox, yielding a routing key. This routing key can be supplied as context to the request to route along the yellow path as shown above.
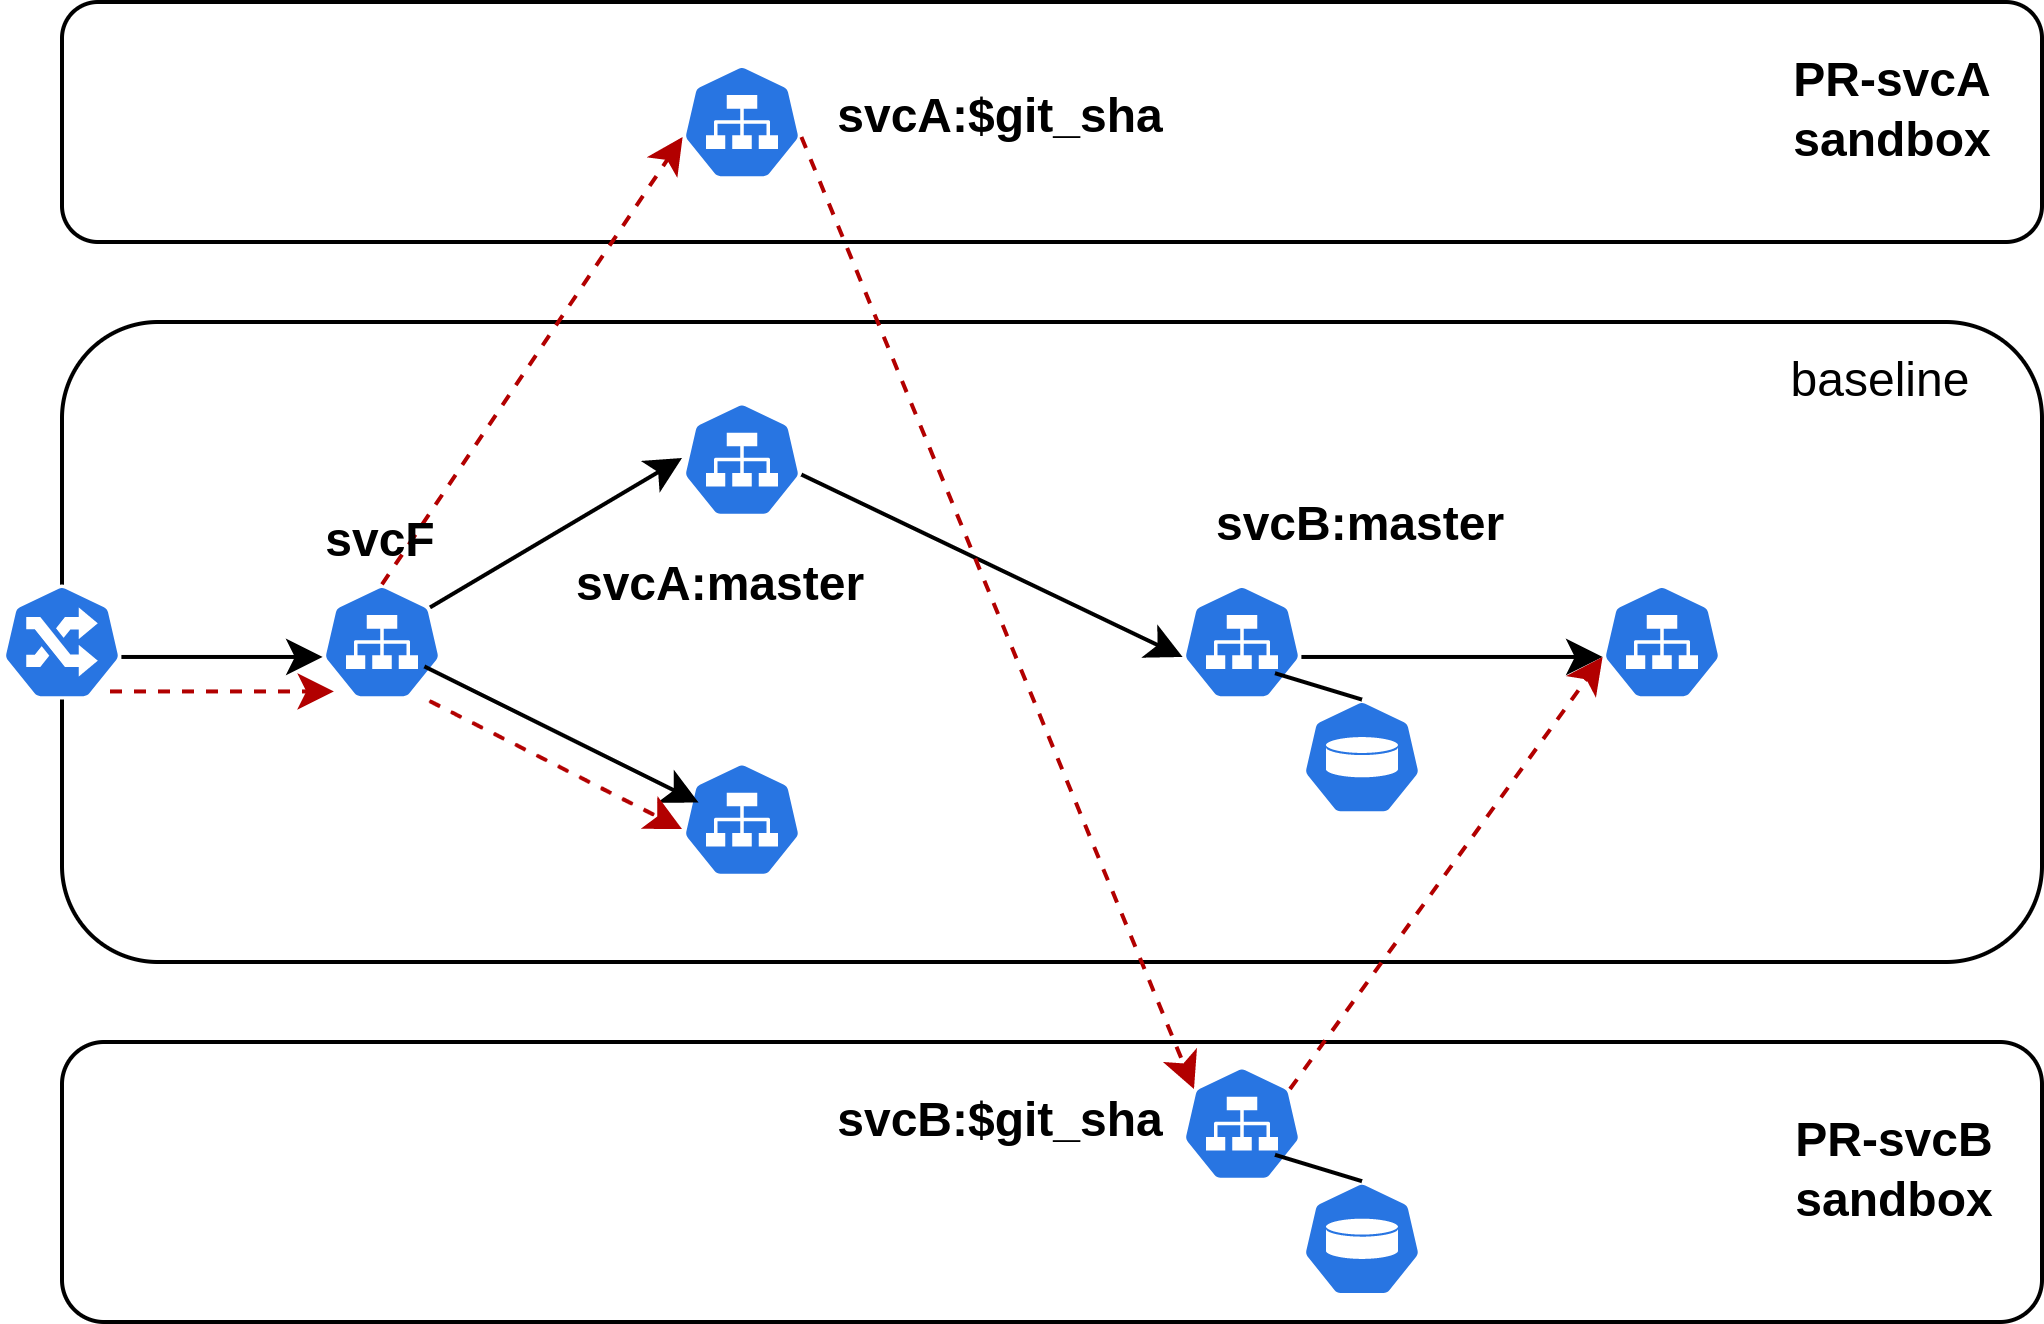
Previewing changes in multiple services
Now, in the same setup as above, if we have a feature that spans both svcA and
svcB, i.e. there are pull requests on both of these repositories that need to
be tested together, we create a RouteGroup that spans both
sandboxes, corresponding to which we get a single routing key. This routing key
can be supplied as context to the request to route along the red path as shown
below.
The above example assumes a setup where each microservice has a separate repository for ease of understanding. Note that the same methodology applies to monorepos, with the only difference being how the CI integration for Sandboxes is set up.
How to set up Feature Previews
Setting up Sandboxes
To set up a sandbox, a YAML specification is required.
These files are commonly checked into each repository itself under a .signadot
directory. Sandbox specification supports templating that allows it to
dynamically add parameters that are specific to that run of CI (such as the
image tag).
Typically, for feature previews, sandboxes are set up on each repository such that the sandbox lifecycle is tied to the lifecycle of a Pull Request. This may be done using the CI process or using a native integration such as GitHub Pull Request Integration.
To make use of sandboxes for feature previews, labels are used. When creating a RouteGroup, you can define match criteria by making use of these labels as described in the section below.
Generally, it is useful to include some context in the labels that would help
users effectively match groups of sandboxes for routing requests through them -
typically CI and Pull Request context. An example is shown below that sets a
label for git-branch.
name: '@{name}'
spec:
  description: sandbox with no changes
  cluster: <your cluster>
  labels:
    signadot/github-repo: "myorg/repo1"
    signadot/github-pull-request: "@{github-pr}" # filled in at execution time by CI
    branch: "@{git-branch}"                      # filled in at execution time by CI
    git-sha: "@{git-sha}"                        # filled in at execution time by CI
  forks:
  - forkOf:
      kind: Deployment
      name: route
      namespace: hotrod
    customizations:
      # ...
Setting up RouteGroups
RouteGroups are the primary routing abstraction in the sandbox model of environments. RouteGroups make use of sandbox labels to match one or more sandboxes and include them in a single routing context. A RouteGroup can be created using the UI, CLI or API that specifies the following match criteria:
For example, let us take a sandbox created for a particular Pull Request that has the following labels:
Matching a single sandbox
# spec.labels for sandbox on repo1
signadot/github-repo: "myorg/repo1"
branch: feat-x-backend
# routegroup for matching the above sandbox
name: my-rg-1
spec:
  cluster: staging
  match:
    all:
    - label:
        key: signadot/github-repo
        value: myorg/repo1
    - label:
        key: branch
        value: feat-x-backend
  endpoints:
    # ... optional preview endpoints
This above specification will match the specified sandbox. To learn about different ways in which you can send requests to this RouteGroup, refer to the section below on accessing the environment.
There is a shorthand mechanism for specifying a RouteGroup within the sandbox specification itself known as defaultRouteGroup. This mechanism can only be used to route requests through a single sandbox. To route requests through multiple sandboxes, a separate RouteGroup entity must be created by making use of label matching as described above.
Matching multiple sandboxes
Let us say that on different repositories there are 2 Pull Requests open with their respective sandboxes that contain labels as shown below:
# spec.labels for sandbox on repo1
signadot/github-repo: "myorg/repo1"
branch: feat-x-backend

# spec.labels for sandbox on repo2
signadot/github-repo: "myorg/repo2"
branch: feat-x-frontend
We can create a RouteGroup that encompasses both of these sandboxes:
# routegroup for matching both sandboxes specified above
name: my-rg-2
spec:
  cluster: staging
  match:
    all:
    - label:
        key: branch
        value: feat-x-* # wildcard match
  endpoints:
    # ... optional preview endpoints
This above specification will match both specified sandboxes. For full details on how you can use match criteria for constructing your RouteGroups, refer to the documentation on matching.
To learn about different ways in which you can send requests to this RouteGroup, refer to the section below on accessing the environment.
Accessing Feature Previews
Once a RouteGroup has been created, you can access the environment, i.e. send requests to it in several different ways as outlined below.
Through Hosted Preview URLs
The easiest way to exercise the request flow is by using spec.endpoints in the
RouteGroup. It will create hosted preview URLs for you of the form
*.preview.signadot.com which can point to any service that is addressable
within your Kubernetes cluster (may also be Kubernetes service URLs).
name: my-rg
spec:
  # ...
  endpoints:
  - name: frontend-endpoint
    target: http://frontend.default.svc:8080
  - name: ingress-url
    target: https://my.ingress.url:443
URLs returned as endpoints are authenticated and require an API Key / Web authentication to be accessed. They set request context and headers automatically so that the requests are routed correctly through your services.
Manually specifying Routing Key on requests
If you want to use ingress URLs, or simply not use hosted preview URLs provided, you can set request headers yourself on any requests to your services. When a RouteGroup is created, it will return a Routing Key, which can then be set using any of the supported header propagation mechanisms which will in turn cause the request to be re-routed accordingly.
Note that the hosted preview URLs provide a convenience mechanism that wraps this functionality and sets the correct headers/context automatically.
From a Web Frontend
- Signadot Chrome Extension
- Third-Party Extension: You can use a Browser Extension like ModHeader that work by setting headers on all requests from the frontend. So, by taking the Routing Key from the RouteGroup and specifying that as a header, you can exercise your changes easily from the Frontend.
From a Mobile App
In the case of testing a feature from a mobile application frontend, it is common to implement a mechanism for the test frontend applications to take the routing key as input and supply that to all requests that they make to the backend.
Demo Video
Here's a demo video of how you use Signadot RouteGroups to setup feature previews across multiple pull requests:
Next Steps
This document covered the basics of setting up a Sandbox and RouteGroup for feature previews. You can read more in-depth about Sandboxes and RouteGroups in the reference documentation.